Как измерить качество кода Django с помощью SonarQube, Pytest и покрытия
Приветствую вас, товарищи энтузиасты кодинга!
Мы глубоко погрузимся в сферу оценки качества кода Django. В этом подробном руководстве я расскажу вам о том, как измерить качество кода вашего приложения на базе Django.
К концу этого учебного курса вы сможете:
- Создание CRUD API с использованием Django и DRF (Django REST Framework)
- Написание автоматизированных тестов для API с помощью Pytest
- Измерение покрытия тестами кода с помощью Coverage
- Использование SonarQube для оценки качества кода, выявления запахов кода, уязвимостей безопасности и т.д.
Необходимые условия для работы с этим учебным пособием включают:
- Установка Python 3 на выбранную вами операционную систему (ОС). В данном руководстве мы будем использовать Python 3.10.
- Базовые знания Python и Django
- Любой редактор кода на ваш выбор
Давайте без промедления перейдем к делу и начнем.
Как запустить API в работу
Для начала откройте Терминал или bash. Создайте каталог или папку для вашего проекта с помощью команды:
mkdir django-quality && cd django-quality
В моем случае имя папки - "django-quality".
Для изоляции зависимостей проекта нам необходимо использовать виртуальную среду Python.
Для создания виртуальной среды используйте следующую команду в терминале или bash:
python3 -m venv venv
Активируйте virtualenv, выполнив следующую команду:
source venv/bin/activate
Если все работает нормально, то вы должны увидеть индикатор виртуальной среды, заключенный в скобки, аналогично изображению, приведенному ниже:

Python Virtualenv успешно активирован
В корневом каталоге проекта создайте папку "requirements", в которой будут храниться внешние пакеты, необходимые для различных стадий разработки, таких как dev (development) и staging.
Внутри папки "requirements" создайте два файла: "base.txt" и "dev.txt". Файл "base.txt" будет включать общие пакеты, необходимые приложению, а файл "dev.txt" будет содержать зависимости, специфичные для режима разработки.
К этому моменту содержимое папки проекта должно иметь следующую структуру
- requirements
    ├── base.txt
    └── dev.txt
- venv
Ниже приведено обновленное содержимое файлов "base.txt" и "dev.txt":
base.txt
Django==4.0.6
djangorestframework==3.13.1
drf-spectacular==0.22.1
dev.txt
-r base.txt
pytest-django==4.5.2
pytest-factoryboy==2.5.0
pytest-cov==4.1.0
- djangorestframework: Используется для разработки API.
- drf-spectacular: Используется для автоматизированного документирования API.
- pytest-cov: Используется для измерения покрытия кода во время тестирования.
- pytest-factoryboy: Используется для создания тестовых данных с помощью паттернов фабрики.
Убедитесь, что виртуальная среда активирована, затем выполните следующую команду в корневом каталоге для установки зависимостей, указанных в файле "dev.txt":
pip install -r requirements/dev.txt
Для создания нового проекта Django можно выполнить следующую команду:
django-admin startproject core .
Имя проекта - 'core'. Вы можете использовать любое подходящее имя, соответствующее вашему сценарию использования.
К этому моменту вы должны увидеть несколько файлов и папок, автоматически созданных после выполнения команды.
Ниже приведена текущая структура проекта:
├── core
│   ├── asgi.py
│   ├── __init__.py
│   ├── settings.py
│   ├── urls.py
│   └── wsgi.py
├── manage.py
├── requirements
│   ├── base.txt
│   └── dev.txt
└── venv
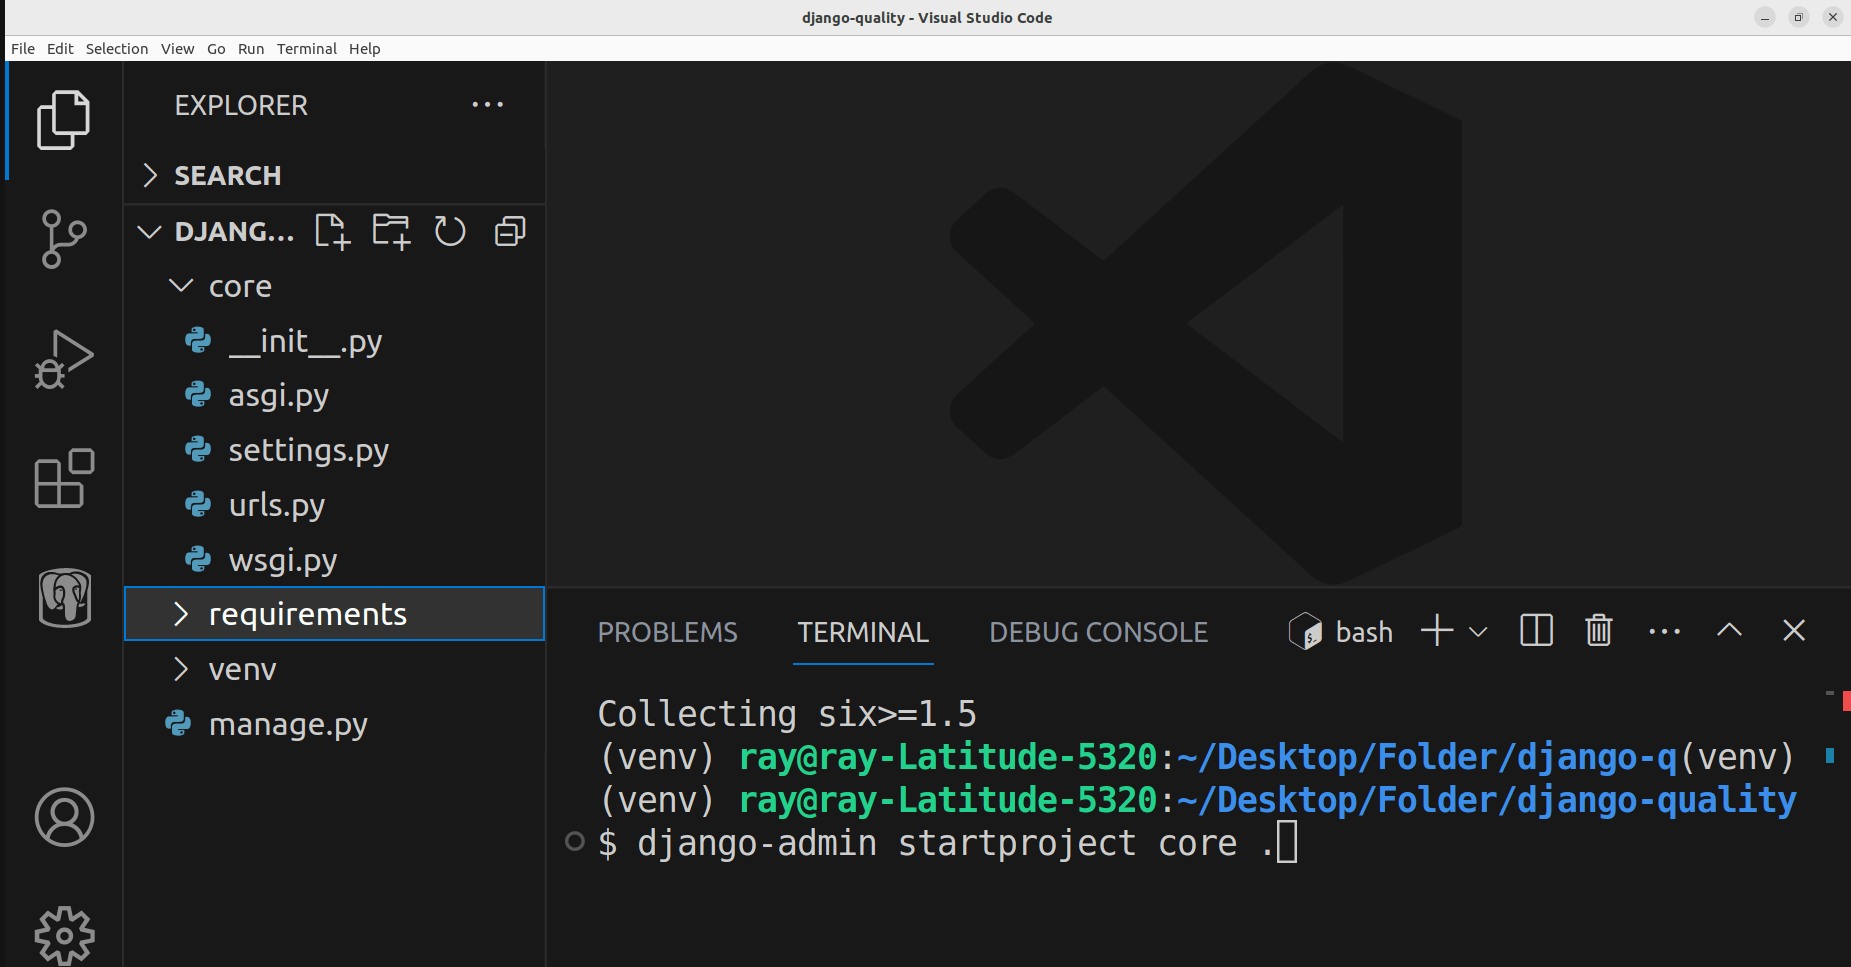
Текущая структура папок в VSCode
API, который мы создадим, будет представлять собой базовый API блога с CRUD-функциональностью. Создадим в проекте новое приложение, в котором будут размещены все файлы, связанные с функциями блога.
Выполните эту команду для создания нового приложения под названием 'blog':
python manage.py startapp blog
К этому моменту командой была автоматически создана новая папка с именем 'blog'.
Ниже приведена структура папок:
├── blog
│   ├── admin.py
│   ├── apps.py
│   ├── __init__.py
│   ├── migrations
│   ├── models.py
│   ├── tests.py
│   └── views.py
├── core
├── manage.py
├── requirements
└── venv
Обновите файл models.py в папке blog. Класс Blog определяет схему базы данных для блога.
blog/models.py
from django.db import models

class Blog(models.Model):
    title = models.CharField(max_length=50)
    body = models.TextField()
    published = models.BooleanField(default=True)
    created_at = models.DateTimeField(auto_now_add=True)
Создайте новый файл с именем 'serializers.py' в папке 'blog' и обновите его содержимое, как показано ниже:
blog/serializers.py
from rest_framework import serializers

from .models import Blog

class BlogSerializer(serializers.ModelSerializer):
    class Meta:
        model = Blog
        fields = '__all__'

    extra_kwargs = {
            "created_at": {"read_only": True},
        }
Класс BlogSerializer используется для проверки входящих данных блога, отправленных клиентом (например, из фронтенда или мобильного приложения), на соответствие ожидаемому формату.
Кроме того, класс serializer используется как для сериализации (преобразования объектов Python в передаваемый формат, например JSON), так и для десериализации (преобразования передаваемого формата, например JSON, обратно в объекты Python).
Давайте создадим представление для работы с CRUD-функциями, используя DRF ModelViewSet для легкого создания API с помощью всего нескольких строк кода.
blog/views.py
from rest_framework import filters, viewsets

from .models import Blog
from .serializers import BlogSerializer


class BlogViewSet(viewsets.ModelViewSet):
    queryset = Blog.objects.all()
    http_method_names = ["get", "post", "delete", "patch","put"]
    serializer_class = BlogSerializer
    filter_backends = [
        filters.SearchFilter,
        filters.OrderingFilter,
    ]
    filterset_fields = ["published"]
    search_fields = ["title", "body"]
    ordering_fields = [
        "created_at",
    ]
Создайте новый файл с именем 'blog.urls' в папке 'blog'.
При использовании маршрутизатора DRF для настройки URL-адресов, URL-адреса автоматически генерируются на основе разрешенных методов, определенных в BlogViewSet.
blog/urls.py
from django.urls import include, path

from rest_framework.routers import DefaultRouter

from .views import BlogViewSet

app_name = "blog"

router = DefaultRouter()
router.register("", BlogViewSet)

urlpatterns = [
    path("", include(router.urls)),
]
Следующий шаг - регистрация файла urls.py, определенного в приложении 'blog', в файле urls.py основного проекта. Для этого необходимо найти файл urls.py проекта, который служит отправной точкой для маршрутизации URL.
core/urls.py
from django.contrib import admin
from django.urls import path, include
from drf_spectacular.views import (
    SpectacularAPIView,
    SpectacularRedocView,
    SpectacularSwaggerView,
)

urlpatterns = [
    path('api/schema/', SpectacularAPIView.as_view(), name='schema'),
    path('api/v1/doc/', SpectacularSwaggerView.as_view(url_name='schema'), name='swagger-ui'),
    path('api/v1/redoc/', SpectacularRedocView.as_view(url_name='schema'), name='redoc'),
    path('admin/', admin.site.urls),
    path('api/v1/blogs/', include('blog.urls')),
]
URL api/v1/blogs/ сопоставляется с URL, определенными в blog.urls. Кроме того, для автоматизированного документирования API используются и другие URL.
Обновите файл settings.py, расположенный в папке core. Этот файл содержит конфигурации для приложения Django.
В разделе INSTALLED_APPS зарегистрируйте только что созданное приложение "Блог", а также все необходимые сторонние приложения. Заметим, что для краткости стандартные приложения Django не включены в следующий список:
settings.py
INSTALLED_APPS = [


    #Third-party Apps
    'drf_spectacular',

    #Local Apps
    'blog',
]
Обновите файл settings.py, включив в него конфигурации, связанные с Django REST Framework (DRF) и документацией.
settings.py
REST_FRAMEWORK = {
    "DEFAULT_SCHEMA_CLASS": "drf_spectacular.openapi.AutoSchema",
    "TEST_REQUEST_DEFAULT_FORMAT": "json",
}


SPECTACULAR_SETTINGS = {
    'SCHEMA_PATH_PREFIX': r'/api/v1',
    'DEFAULT_GENERATOR_CLASS': 'drf_spectacular.generators.SchemaGenerator',
    'SERVE_PERMISSIONS': ['rest_framework.permissions.AllowAny'],
    'COMPONENT_SPLIT_PATCH': True,
    'COMPONENT_SPLIT_REQUEST': True,
    "SWAGGER_UI_SETTINGS": {
        "deepLinking": True,
        "persistAuthorization": True,
        "displayOperationId": True,
        "displayRequestDuration": True
    },
    'UPLOADED_FILES_USE_URL': True,
    'TITLE': 'Django-Pytest-Sonarqube - Blog API',
    'DESCRIPTION': 'A simple API setup with Django, Pytest & Sonarqube',
    'VERSION': '1.0.0',
    'LICENCE': {'name': 'BSD License'},
    'CONTACT': {'name': 'Ridwan Ray', 'email': 'ridwanray.com'},
    #OAUTH2 SPEC
    'OAUTH2_FLOWS': [],
    'OAUTH2_AUTHORIZATION_URL': None,
    'OAUTH2_TOKEN_URL': None,
    'OAUTH2_REFRESH_URL': None,
    'OAUTH2_SCOPES': None,
}
Запустим команду migrations, чтобы убедиться, что модели в приложении синхронизированы со схемой базы данных.
Для синхронизации моделей со схемой базы данных выполните в корневом каталоге следующие команды:
python manage.py makemigrations
python manage.py migrate
Для запуска сервера разработки выполните следующую команду:
python manage.py runserver

Запуск локального сервера разработки с помощью команды runserver
Сейчас приложение запущено по адресу http://127.0.0.1:8000/.
Для доступа к документации посетите http://127.0.0.1:8000/api/v1/doc/.
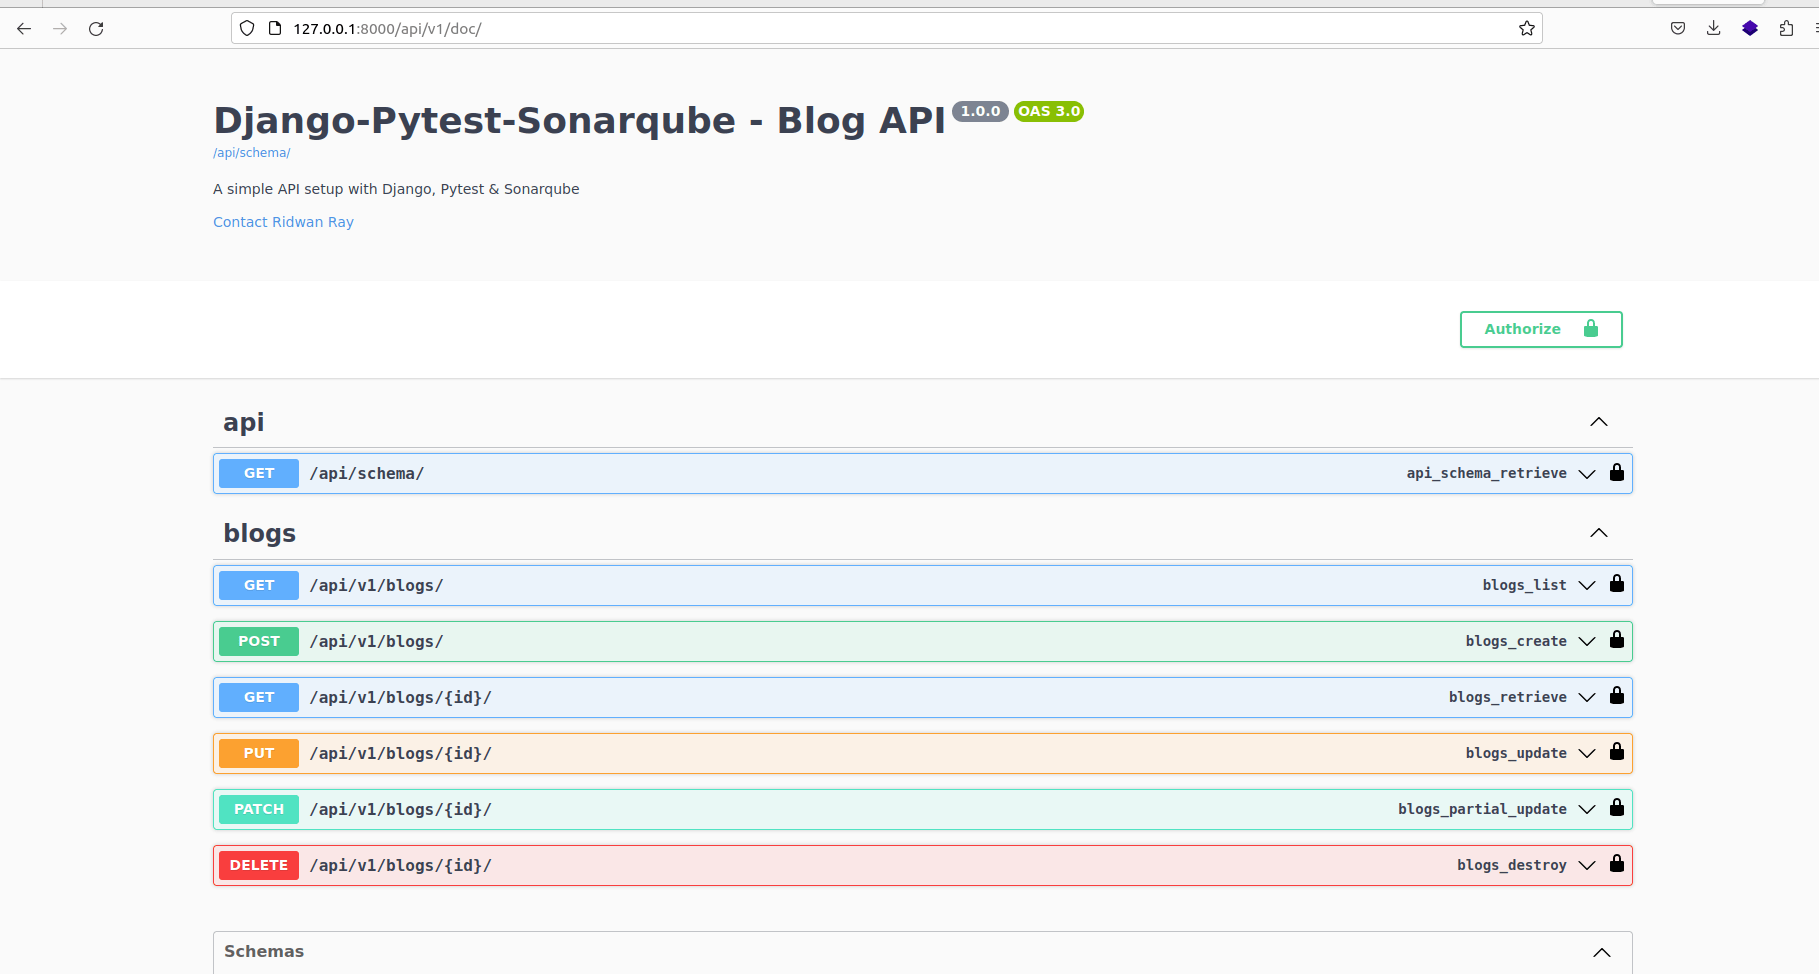
Автоматизированное документирование API блога с помощью drf-spectacular
Как писать автоматизированные тесты с помощью Pytest
Pytest, инструмент тестирования, который мы используем для написания автоматизированных тестов, включен в состав зависимостей, объявленных в папке требований. Теперь давайте напишем несколько тестов и исследуем его функциональность.
В папке blog при запуске приложения blog автоматически генерируется файл с именем "tests.py". Чтобы упорядочить тесты, создайте в каталоге blog новую папку "tests".
Переместите исходный файл "tests.py" во вновь созданную папку "tests". Чтобы сделать папку "tests" модулем, создайте пустой файл с именем "__init__.py".
Создайте новый файл с именем 'conftest.py' в папке 'tests'. В этом файле будут храниться все приспособления pytest (то есть компоненты многократного использования), необходимые в процессе написания тестов.
Структура тестовой папки:
├── tests
│   ├── conftest.py
│   ├── factories.py
│   ├── __init__.py
│   ├── __pycache__
│   └── tests.py
tests/conftests.py
import pytest
from rest_framework.test import APIClient

@pytest.fixture
def api_client():
    return APIClient()
api_client() - это фикстура Pytest, используемая для осуществления реальных вызовов API.
Создайте новый файл с именем 'factories.py'. Этот файл будет содержать фабрики, используемые при написании тестов. Фабрики предоставляют удобный способ создания объектов (то есть экземпляров моделей) без необходимости каждый раз указывать все атрибуты.
tests/factories.py
import factory
from faker import Faker
from blog.models import Blog

fake = Faker()

class BlogFactory(factory.django.DjangoModelFactory):
    class Meta:
        model = Blog

    title = fake.name()
    body = fake.text()
    published = True
tests/tests.py
import pytest
from django.urls import reverse
from .factories import BlogFactory

pytestmark = pytest.mark.django_db


class TestBlogCRUD:
    blog_list_url = reverse('blog:blog-list')

    def test_create_blog(self, api_client):
        data = {
            "title": "Good news",
            "body": "Something good starts small",
            "published": True
            }

        response = api_client.post(self.blog_list_url, data)
        assert response.status_code == 201
        returned_json = response.json()
        assert 'id' in returned_json
        assert returned_json['title'] == data['title']
        assert returned_json['body'] == data['body']
        assert returned_json['published'] == data['published']

    def test_retrieve_blogs(self, api_client):
        BlogFactory.create_batch(5)
        response = api_client.get(self.blog_list_url)
        assert response.status_code == 200
        assert len(response.json()) == 5

    def test_delete_blog(self, api_client):
        blog = BlogFactory()
        url = reverse("blog:blog-detail",
                      kwargs={"pk": blog.id})
        response = api_client.delete(url)
        assert response.status_code == 204

    def test_update_blog(self, api_client):
        blog = BlogFactory(published= True)
        data = {
            "title": "New title",
            "body": "New body",
            "published": False,
        }
        url = reverse("blog:blog-detail",
                      kwargs={"pk": blog.id})

        response = api_client.patch(url, data)
        assert response.status_code == 200
        returned_json = response.json()
        assert returned_json['title'] == data['title']
        assert returned_json['body'] == data['body']
        assert returned_json['published'] == data['published']
Класс TestBlogCRUD тестирует CRUD-функционал приложения. В классе определены четыре метода, каждый из которых тестирует определенную функциональность CRUD.
Создайте в корневом каталоге файл конфигурации Pytest с именем pytest.ini. Этот файл будет содержать настройки, указывающие Pytest, как располагать тестовые файлы.
pytest.ini
[pytest]
DJANGO_SETTINGS_MODULE = core.settings
python_files = tests.py test_*.py *_tests.py
addopts = -p no:warnings --no-migrations --reuse-db
Для запуска тестов выполните в корневом каталоге команду pytest, как показано ниже:
pytest

Результат выполнения тестовых примеров Pytest
Результаты тестирования показывают, что все четыре тестовых случая успешно пройдены.
На момент написания статьи двумя популярными инструментами, используемыми в сообществе Python для создания отчетов о тестовом покрытии в кодовой базе, являются Coverage и pytest-cov.
В нашем случае мы будем использовать pytest-cov из-за его гибкости при составлении отчетов о тестовом покрытии.
Создайте в корневом каталоге новый файл с именем 'setup.cfg'. Этот файл служит конфигурационным файлом для покрытия.
setup.cfg
[coverage:run]
source = .
branch = True
[coverage:report]
show_missing = True
skip_covered = True
Значение source в секции [coverage:run] задает расположение корневого каталога, из которого будет измеряться тестовое покрытие.
В дополнение к покрытию операторов в тестовом отчете, покрытие ветвей выявляет непокрытые ветви при использовании условных операторов (например, if, else, case).
Примечание: В файле setup.cfg можно указать папки, которые следует исключить из тестового покрытия, например, папки миграции. Мы настроим эти параметры в SonarQube.
Перезапустим тестовые примеры с помощью следующей команды:
pytest --cov --cov-report=xml
Опция --cov-report задает формат отчета о покрытии. Поддерживаются различные форматы, такие как HTML, XML, JSON и т.д. В данном случае мы указываем xml, поскольку он поддерживается SonarQube.
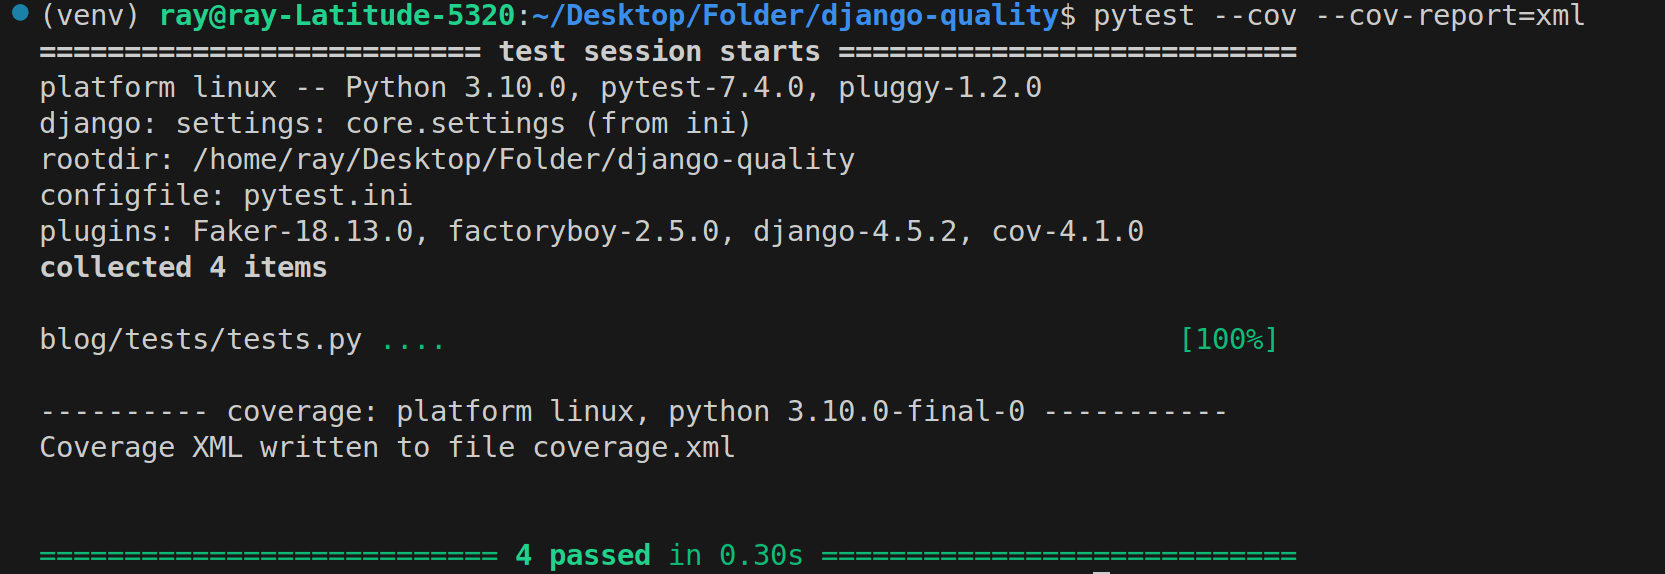
Отчет о покрытии Pytest в формате XML
Для формата HTML в корневом каталоге будет создана папка с именем 'htmlcov'. Эта папка содержит файл 'index.html', который позволяет визуализировать результаты покрытия и области, которые не покрыты.
Как настроить SonarQube
SonarQube - инструмент, используемый для статического анализа кода. Он помогает выявлять проблемы качества кода, ошибки, уязвимости и запахи кода в программных проектах.
Для упрощения процесса мы можем запустить Docker-контейнер на основе образа SonarQube.
Выполните следующую команду в командной строке:
docker run -d -p 9000:9000 -p 9092:9092 sonarqube
Через несколько мгновений, в зависимости от скорости Вашего Интернета, зайдите на сайт http://0.0.0.0:9000/.
Для доступа к приложению можно использовать следующие учетные данные: Имя пользователя: admin Пароль: admin
Далее необходимо загрузить программу Sonar Scanner. Перейдите по этой ссылке и выберите вариант, совместимый с вашей операционной системой (ОС).

Загрузка программы SonarScanner на сайте Sonarsource.com
Распакуйте сонар-сканер и переместите его из папки 'Downloads' в защищенный каталог .
unzip sonar-scanner-cli-4.8.0.2856-linux.zip

mv sonar-scanner-4.2.0.1873-linux /opt/sonar-scanner
Добавьте следующие строки в содержимое файла sonar-scanner.properties, расположенного по адресу /opt/sonar-scanner/conf/sonar-scanner.properties:
vim /opt/sonar-scanner/conf/sonar-scanner.properties
Добавьте эти две строки и сохраните файл:
sonar.host.url=http://localhost:9000
sonar.sourceEncoding=UTF-8
Добавьте /opt/sonar-scanner/bin в переменную окружения PATH системы, выполнив следующую команду:
export PATH="$PATH:/opt/sonar-scanner/bin
Обновить содержимое .bashrc:
vim ~/.bashrc
Добавьте эту строку в файл .bashrc и сохраните его:
export PATH="$PATH:/opt/sonar-scanner/bin
Для применения изменений к текущему сеансу терминала выполните следующую команду:
source ~/.bashrc
Для того чтобы убедиться, что все работает правильно, выполните следующую команду:
sonar-scanner -v

Проверка версии sonarqube на терминале
Перейдите на вкладку "Проекты" на приборной панели SonarQube и перейдите к ручному созданию нового проекта.
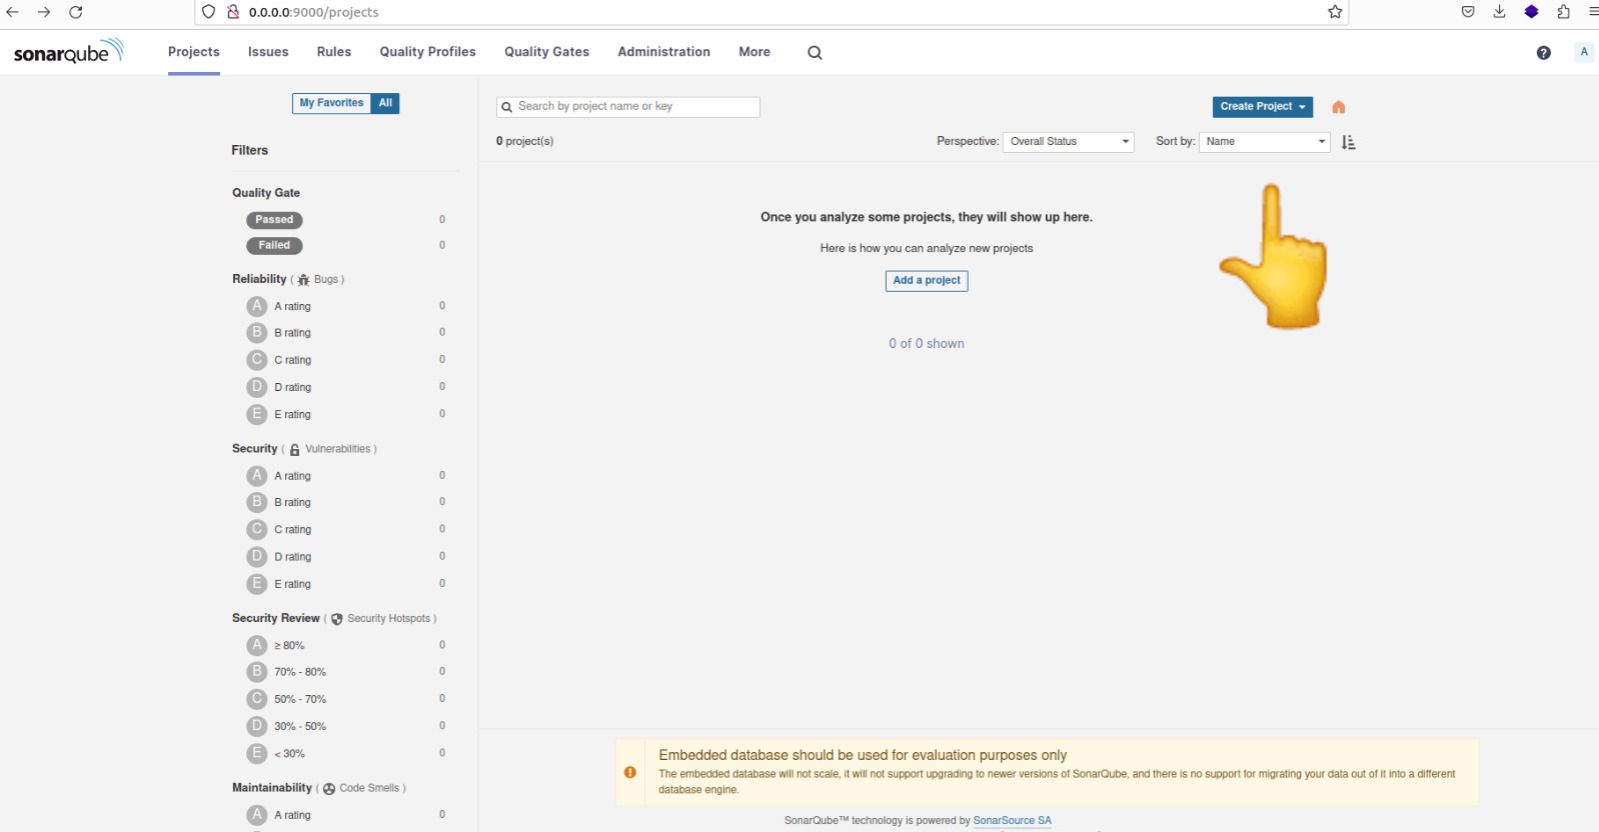
Создание нового проекта на приборной панели sonarqube
Задайте подходящее имя проекта, затем выберите опцию "Использовать глобальную настройку", прежде чем приступить к созданию проекта.
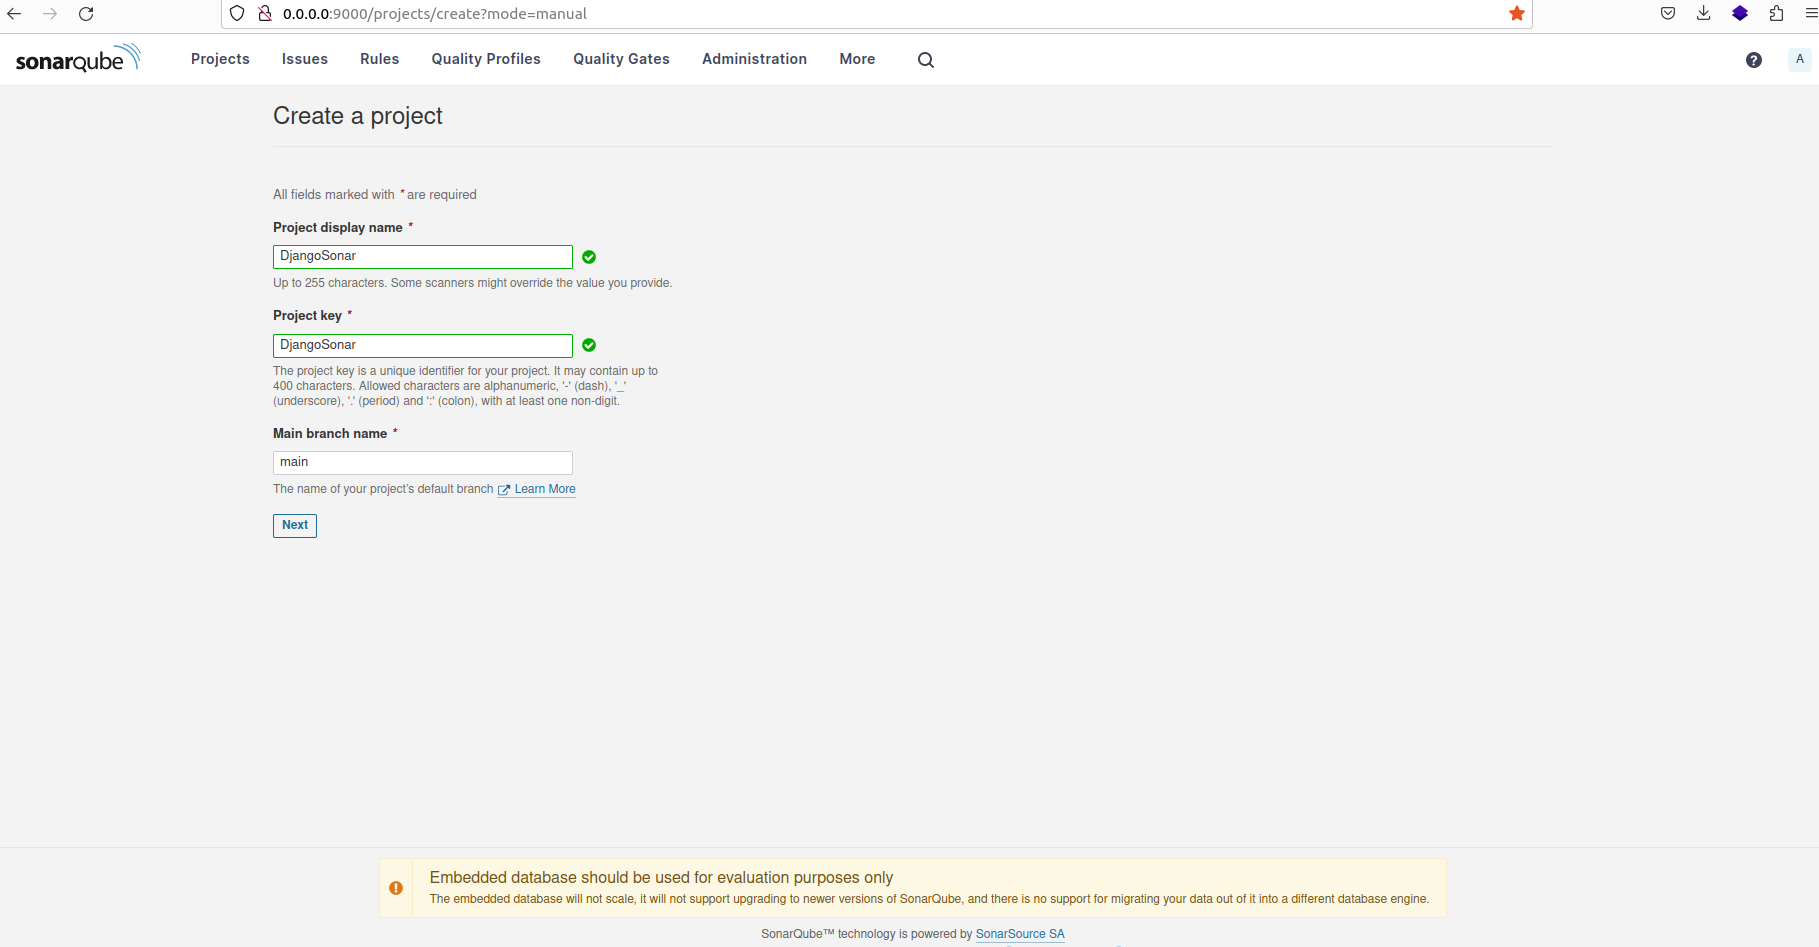
Выбор подходящего имени в качестве имени нового преоекта
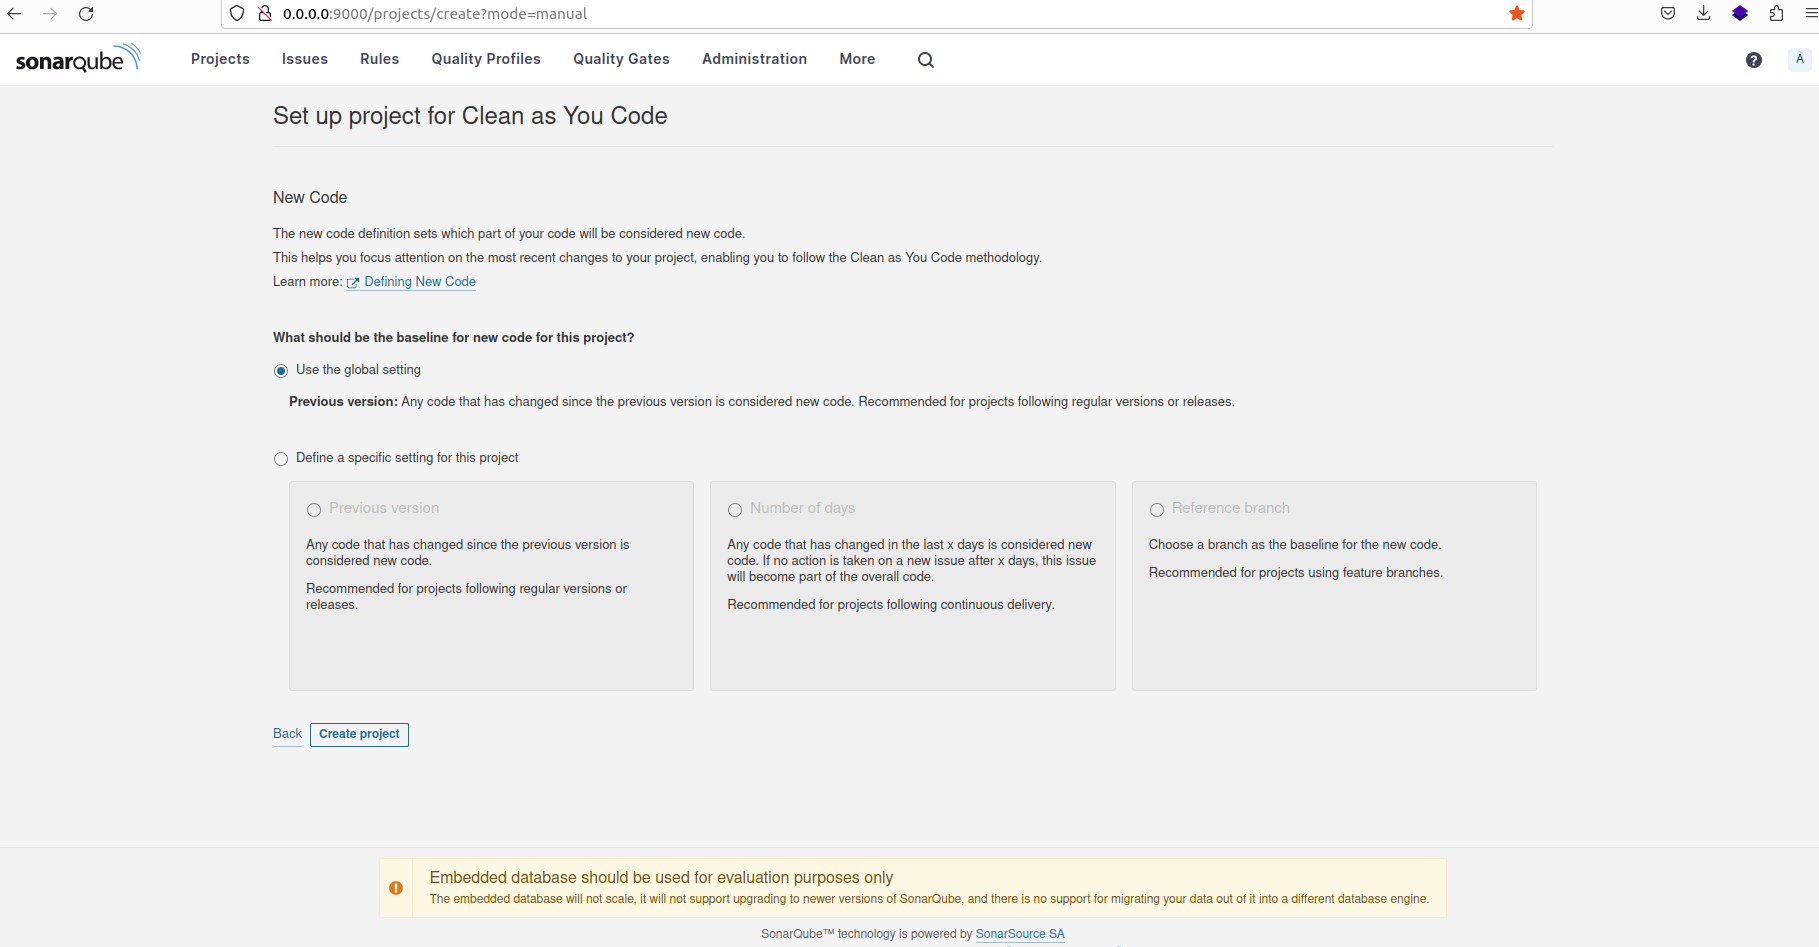
Конфигурирование нового проекта для использования глобальных настроек
После создания проекта вам будет предложено выбрать метод анализа для вашего проекта. Выберите опцию 'Locally'.
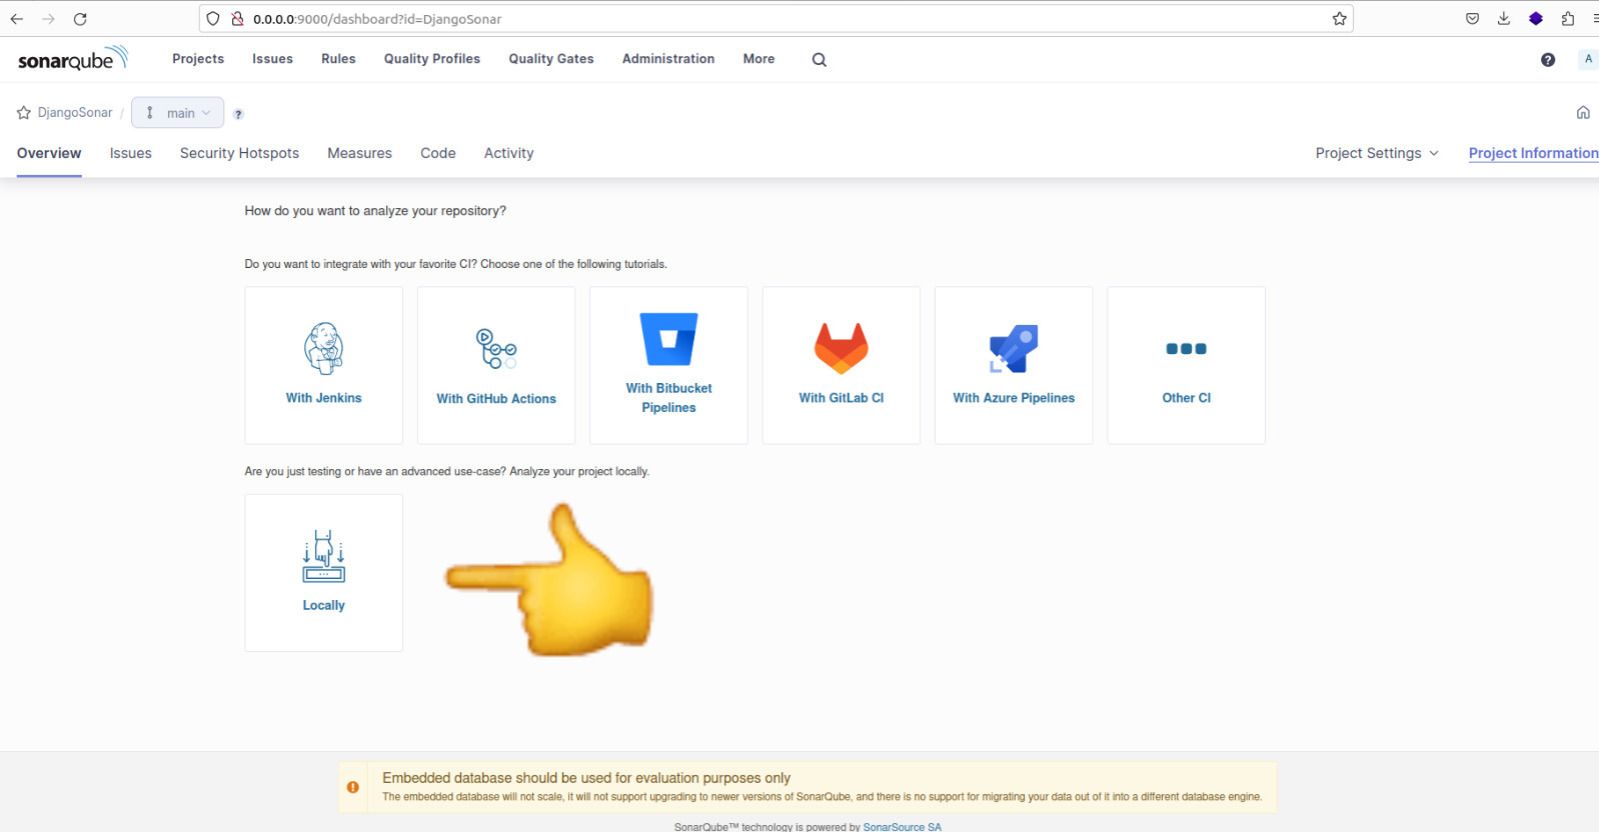
Запустить анализ проекта локально
После выбора опции 'Locally' потребуется сгенерировать токен. Для продолжения работы нажмите кнопку "Продолжить". Далее выберите язык программирования проекта и операционную систему (ОС), на которой он будет работать.

Выбор языка программирования проекта и ОС
Скопируйте отображаемую команду, поскольку мы будем использовать ее для выполнения анализа проекта.
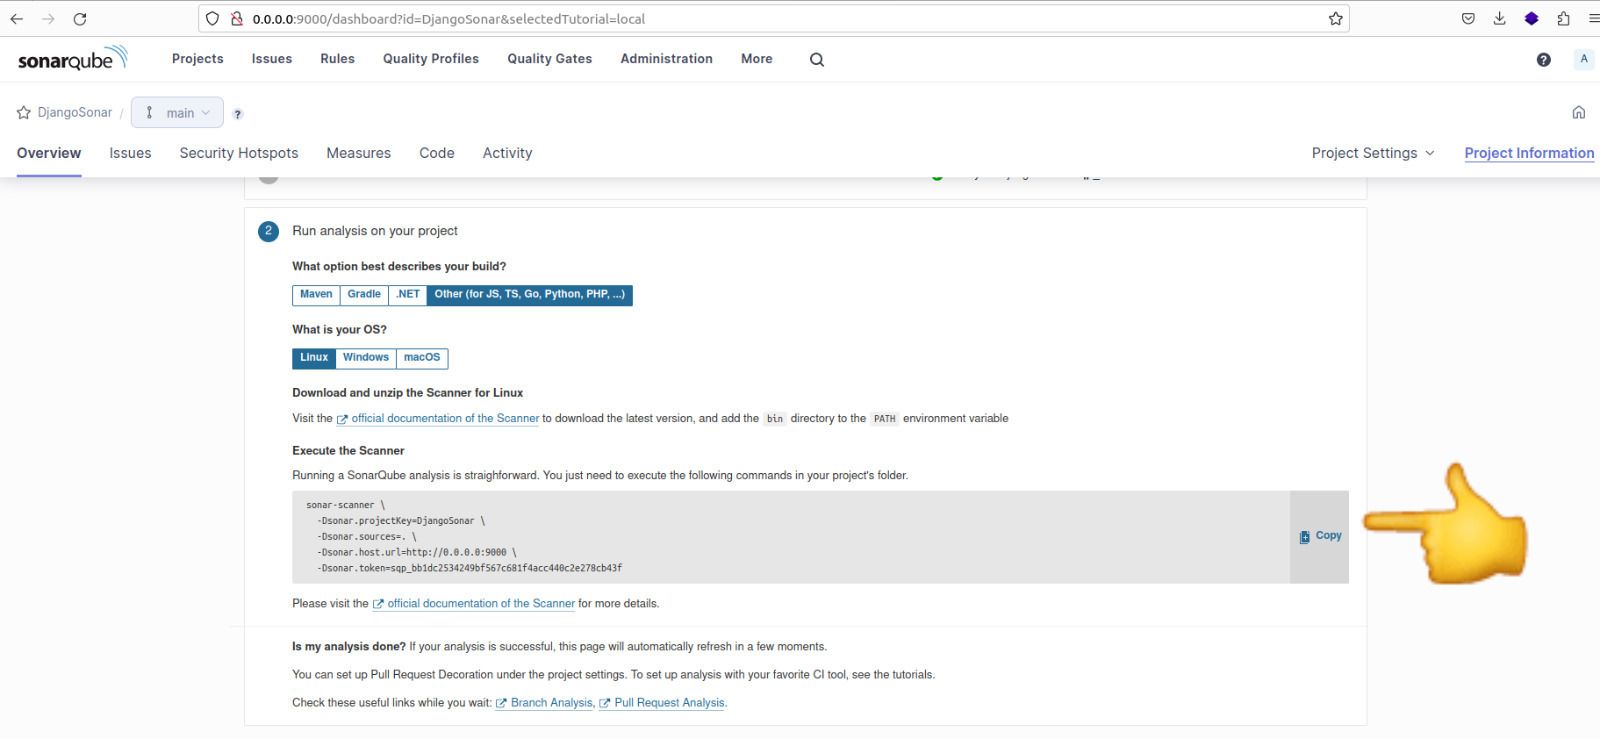
Код, необходимый для запуска анализа
Вот содержание команды:
sonar-scanner \
  -Dsonar.projectKey=newretailer \
  -Dsonar.sources=. \
  -Dsonar.host.url=http://0.0.0.0:9000 \
  -Dsonar.token=sqp_7b6aada8ce53e97ebb7b2bf5e9b64d53b8938a6f \
  -Dsonar.python.version=3
Примечание: В команду добавлена дополнительная строка для указания версии Python в виде -Dsonar.python.version=3.
Перед выполнением команды анализа выполните следующие действия:
- Нажмите на кнопку "Настройки проекта" и выберите "Общие настройки".
- Далее перейдите на вкладку "Область анализа".
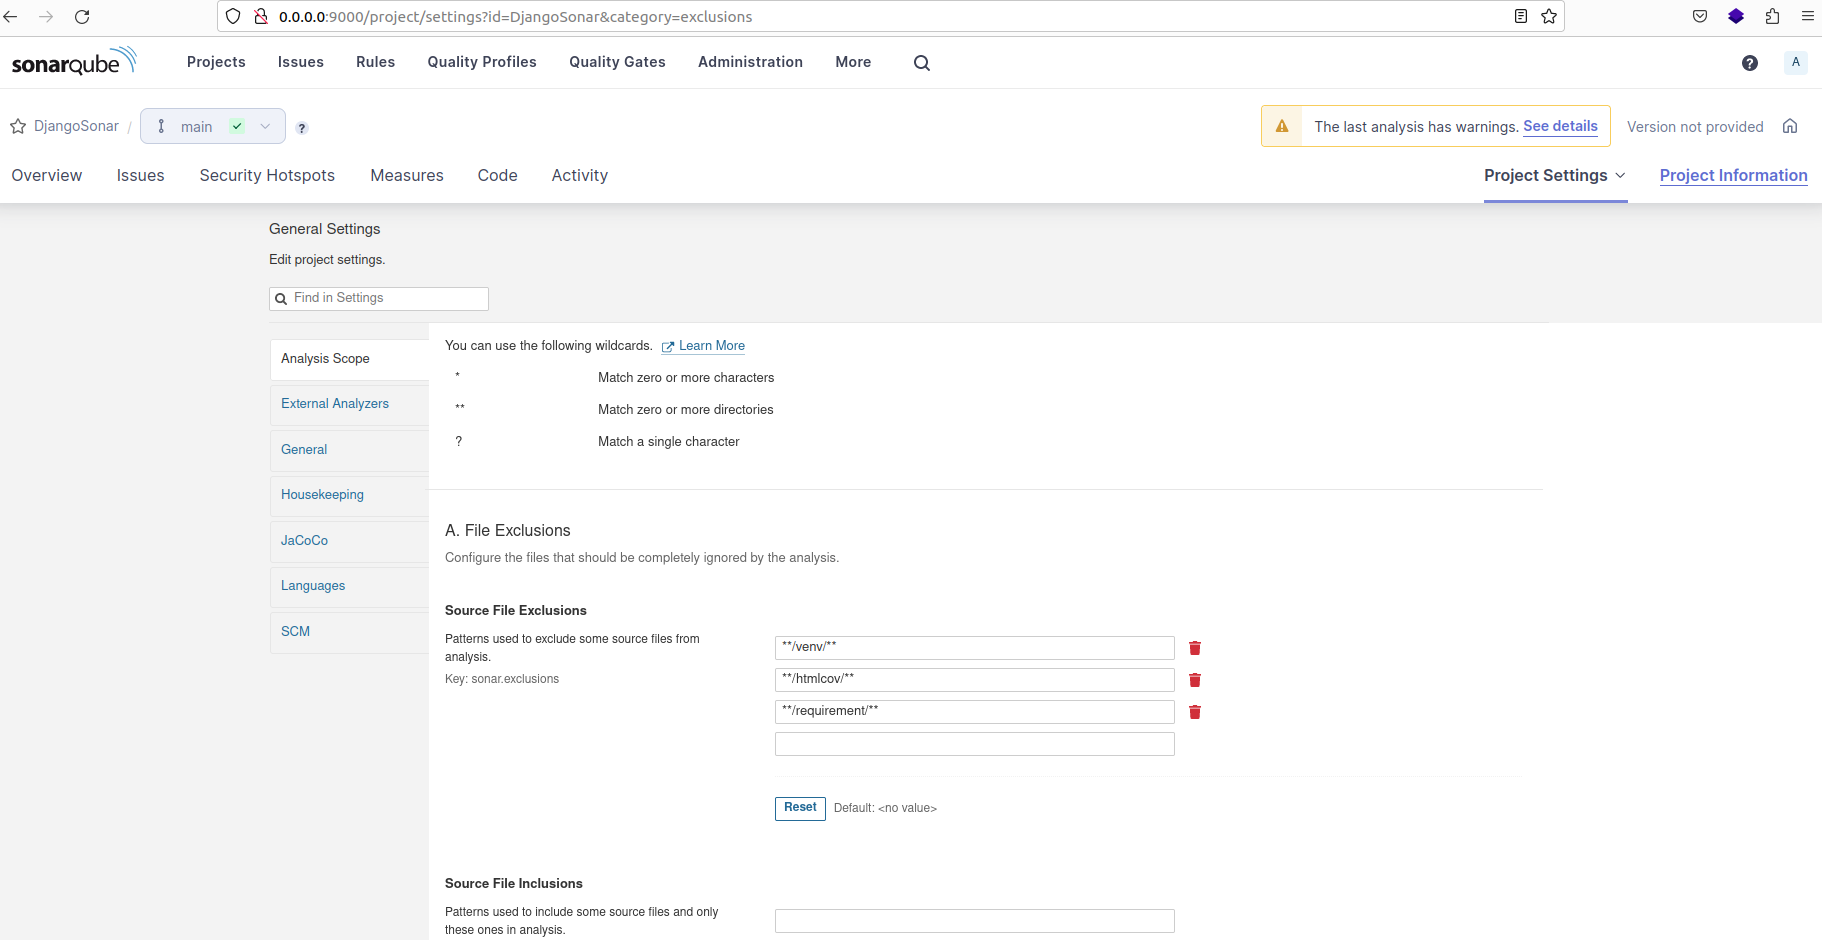
Исходные файлы, которые должны игнорироваться анализом
Исключения исходных файлов используются для указания файлов или папок, которые SonarQube не должен анализировать как часть кодовой базы. Они могут включать файлы или каталоги, которые не являются непосредственной частью кода, но все же присутствуют в каталоге проекта.
Примерами таких файлов или папок являются:
- venv (virtualenv)
- htmlcov (формат HTML покрытия)
- node_modules (каталог модулей Node.js)
Исключения кодового покрытия используются для указания файлов или папок, которые должны быть исключены при расчете процента покрытия.
Ниже приведены шаблоны игнорируемых файлов и папок:
**/tests/**, **/migrations/**, **/admin.py, **/apps.py, core/asgi.py, core/wsgi.py, manage.py
<фигура>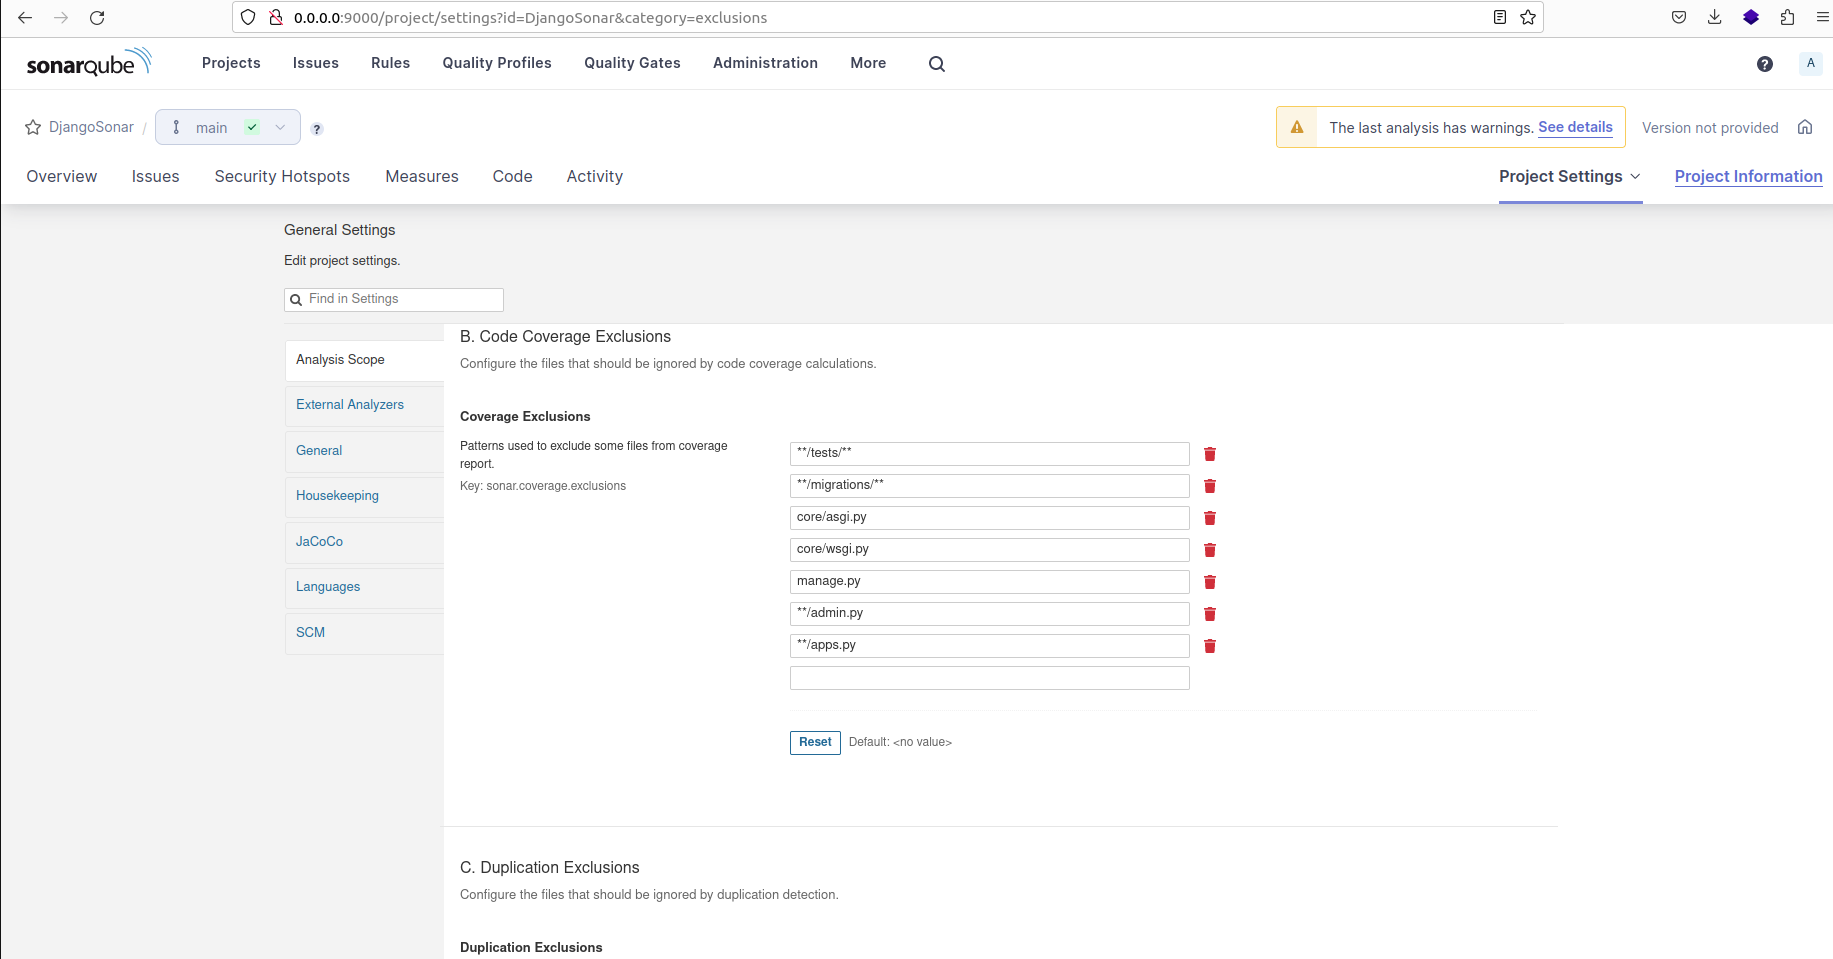
Паттерны, используемые для исключения некоторых файлов из отчета о покрытии и расчета процента покрытия
На вкладке "Languages" выберите "Python" в качестве языка программирования для проекта. Затем обновите путь к отчету о покрытии как "coverage.xml".
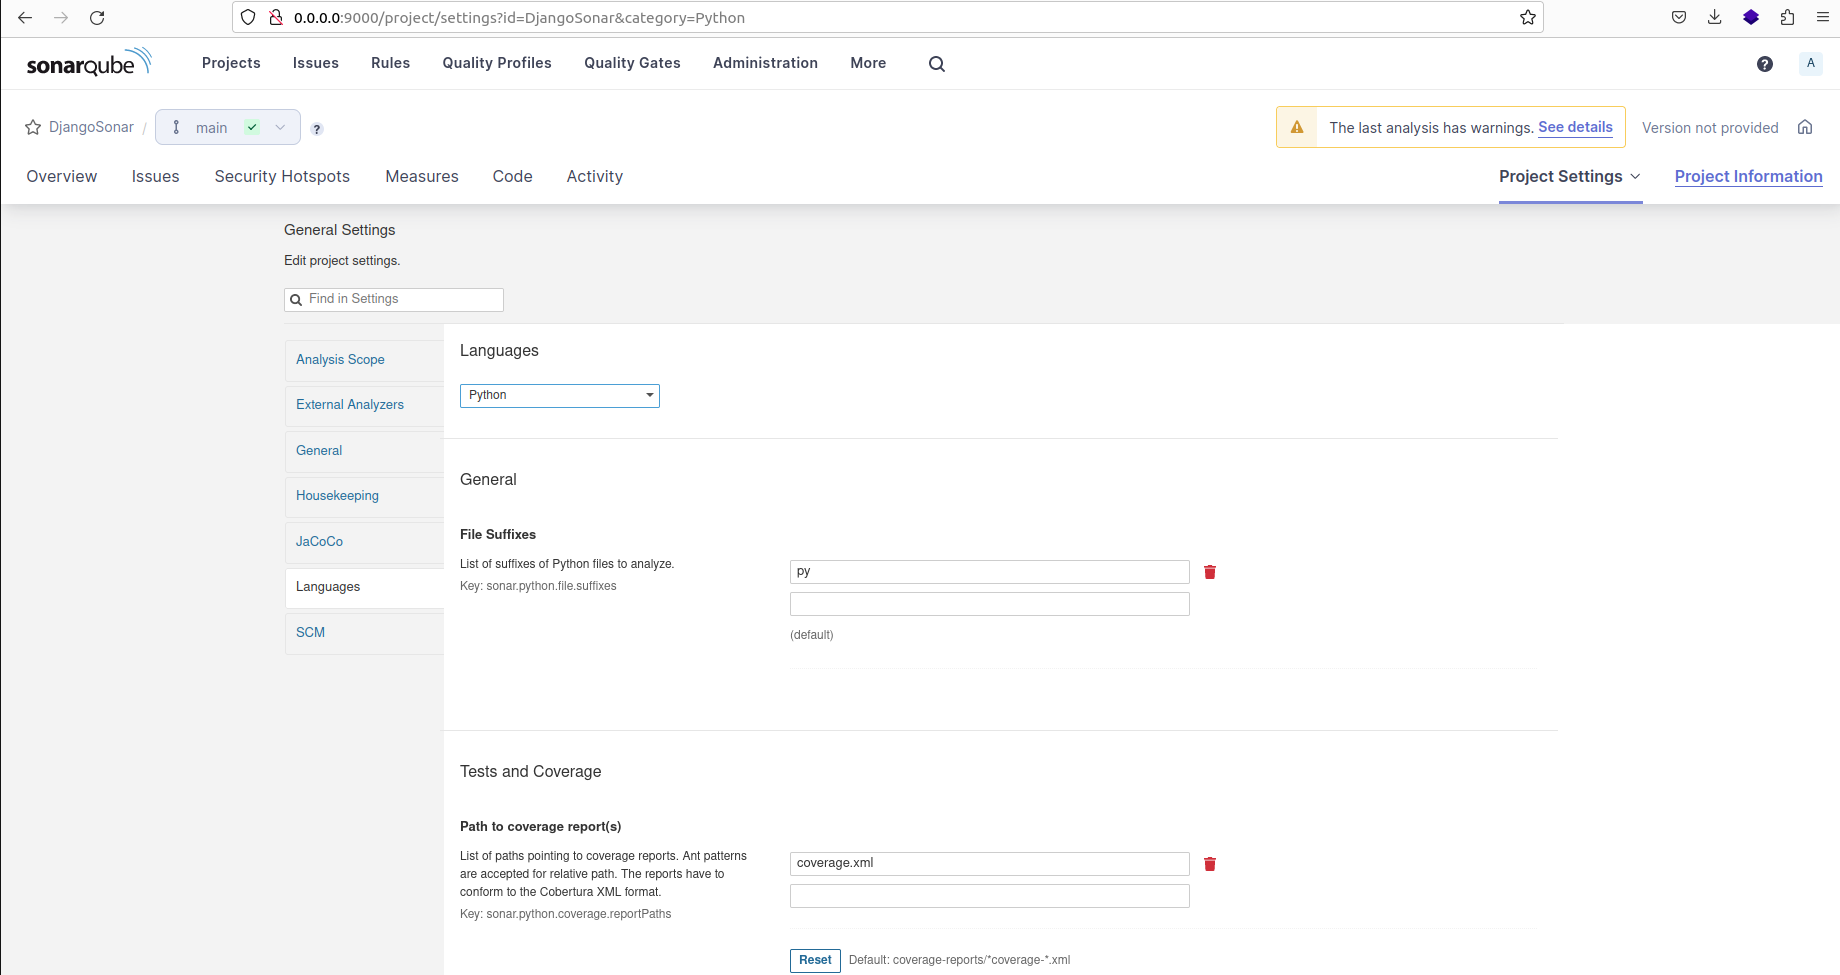
Выбор языка программирования и расположение отчета о покрытии XML
Выполните ранее предоставленную команду в корневом каталоге:
sonar-scanner -Dsonar.projectKey=DjangoSonar -Dsonar.sources=. -Dsonar.host.url=http://0.0.0.0:9000 -Dsonar.token=sqp_bb1dc2534249bf567c681f4acc440c2e278cb43f -Dsonar.python.coverage.reportPaths=coverage.xml -Dsonar.python.version=3
Если все работает правильно, то вы должны увидеть успешный результат.

Запуск анализа sonarqube на проекте с помощью команды, заданной на панели управления
Если при попытке локального анализа проекта возникают ошибки, связанные с несанкционированным доступом или проблемами с правами, выполните следующие действия:
- Войдите в интерфейс администратора SonarQube.
- Перейдите в раздел 'Security'.
- Найдите опцию 'Force user authentication' и отключите ее.
- Сохраните изменения и повторно запустите анализ, используя предыдущую команду.
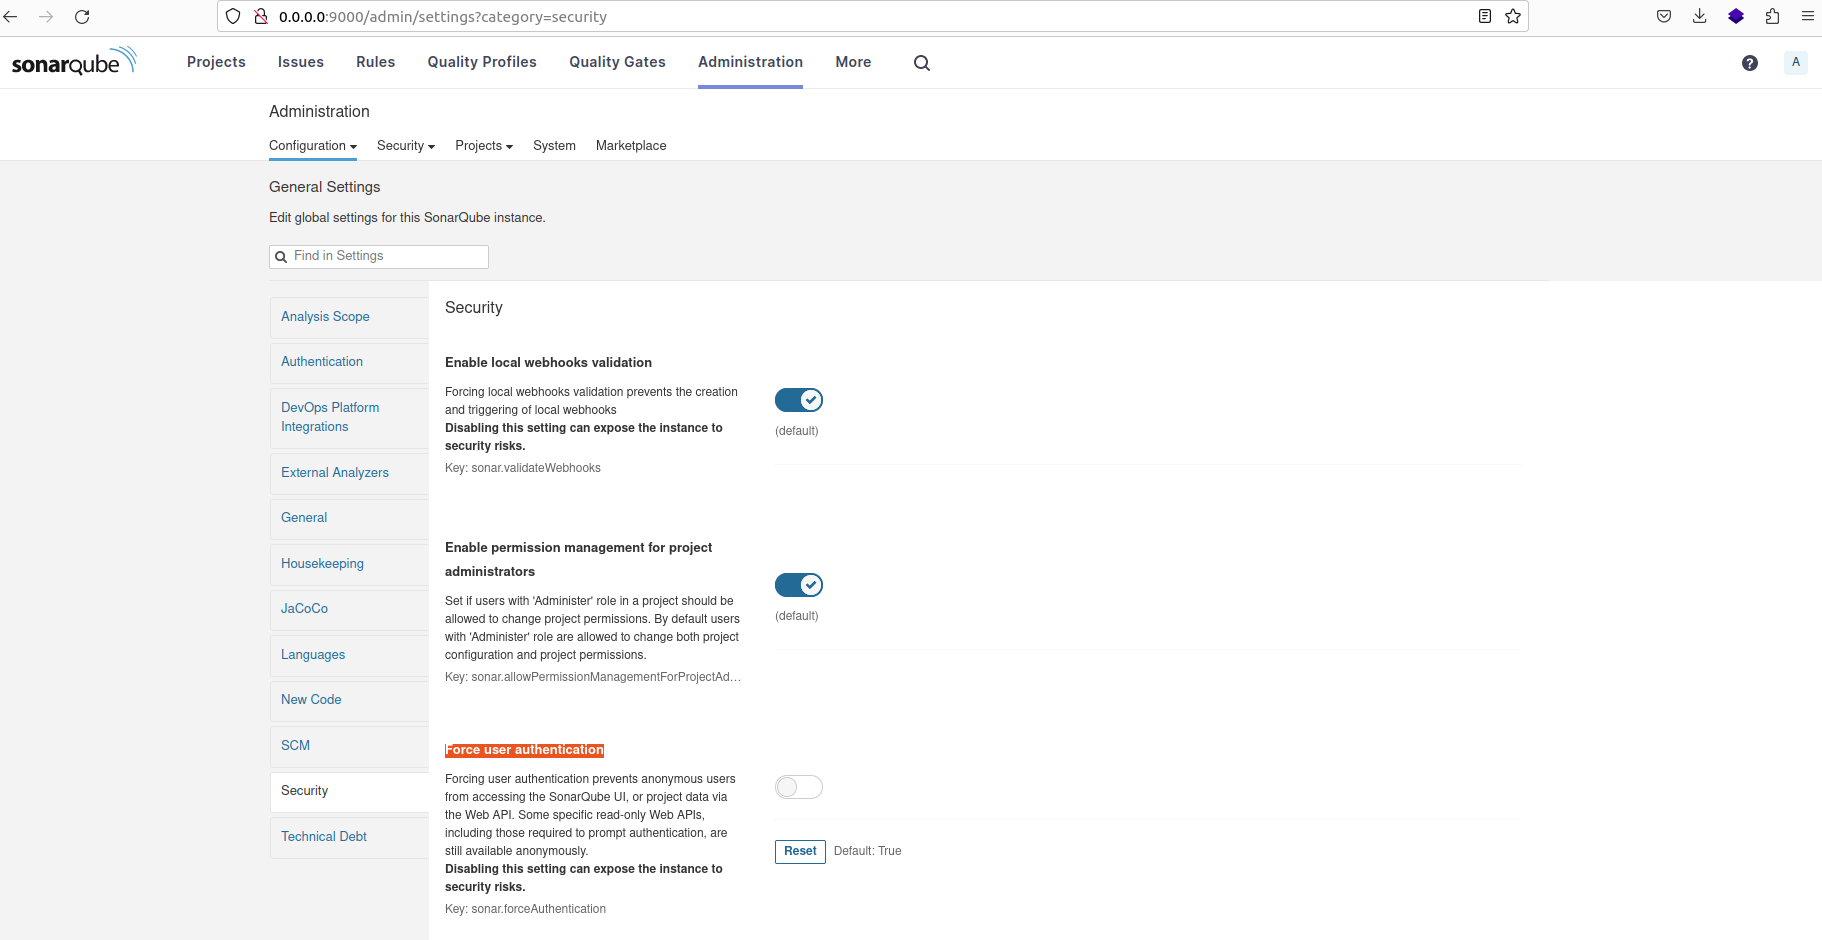
Отладка ошибки аутентификации при анализе проекта
Другой способ устранения ошибок - посещение уведомлений о предупреждениях и проверка ошибок, возникших в ходе анализа проекта.

Предупреждающие сообщения для анализа
Нажмите на кнопку "Общий код", чтобы перейти к разделу общего анализа кода:
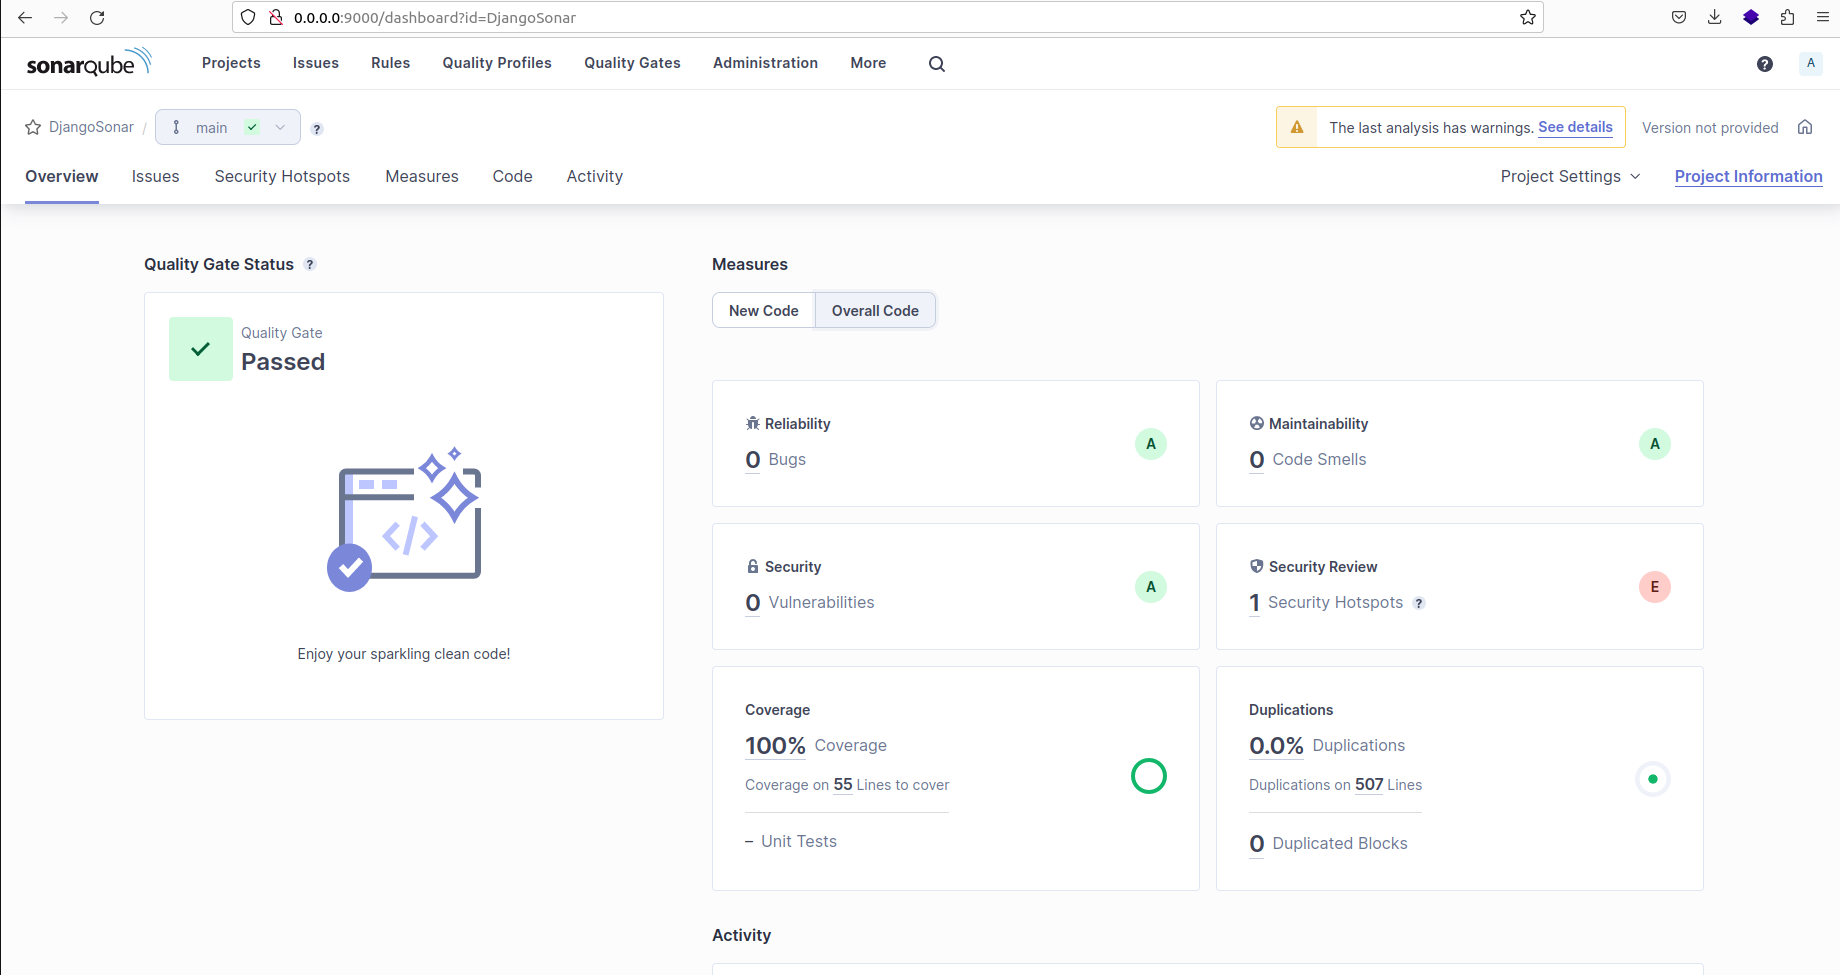
Результат анализа SonarQube для проекта на приборной панели
Вернуться на верх