Веб-безопасность в Django – Как создать безопасное веб-приложение
Безопасность веб-приложений - важный аспект процесса разработки веб-приложений. Особенно по мере увеличения объема хранимых, управляемых и совместно используемых данных.
Как веб-разработчик, он должен уделять первостепенное внимание мерам безопасности, чтобы защитить пользователей и данные своей компании от потенциальных угроз.
В этой статье я продемонстрирую лучшие практики веб-безопасности на примере создания защищенного веб-приложения с использованием Django, мощного веб-фреймворка Python. Я расскажу о хешировании паролей, безопасном управлении сеансами, аутентификации, авторизации и других ключевых аспектах безопасности, сопровождая статью примерами кода.
Прежде чем продолжить работу над этой статьей, имейте в виду, что она не предназначена для абсолютных новичков. Вы должны хорошо понимать язык Python, чтобы извлечь максимальную пользу из этого руководства.
Если вам нужно подтянуть свои базовые навыки программирования на Python и Django, прежде чем продолжить, вот несколько ресурсов, которые могут вам помочь:
- Python для всех от Dr. Chuck
- Django для всех, также от Dr. Chuck
Вы получите доступ к коду в конце статьи.
Установка файловой структуры
Допустим, мы хотим хранить наш проект на рабочем столе. В первую очередь необходимо настроить файловую структуру. Начнем с создания корневого каталога для нашего проекта на рабочем столе (в данном случае WebSec).
mkdir WebSec
cd WebSec
Создание виртуальной среды и ее активация
В Linux (Ubuntu):
python3 -m venv my_env

Source my_env/bin/activate
А в Windows:
python -m venv my_env

my_env\Scripts\activate.bat
Как создать проект Django
Во-первых, если у вас его еще нет, необходимо установить Django с помощью следующей команды:
python -m pip install Django
Затем для создания проекта можно использовать следующую команду:
django-admin startproject web_sec_project .
Создайте проект Django. Не забудьте поставить точку, чтобы избежать дублирования папок.
И, наконец, используйте эту команду для создания приложения:
django-admin startapp web_sec_app
Создать приложение django
В конце структура вашего файла должна выглядеть следующим образом:
WebSec
    my_env/
    web_sec_app/
        __pycache__/
        migrations/
        templates/
        admin.py
        apps.py
        forms.py
        models.py
        tests.py
        urls.py
        views.py
    web_sec_project/
        __pycache__/
        __init__.py
        asgi.py
        settings.py
        urls.py
        wsgi.py
    db.sqlite3
    manage.py
Запустить свой сервер
В терминале IDE выполните следующую команду и проверьте, работает ли ваш проект. Если да, то все готово.
python manage.py runserver
Убедитесь, что вы добавили свое приложение в проект:
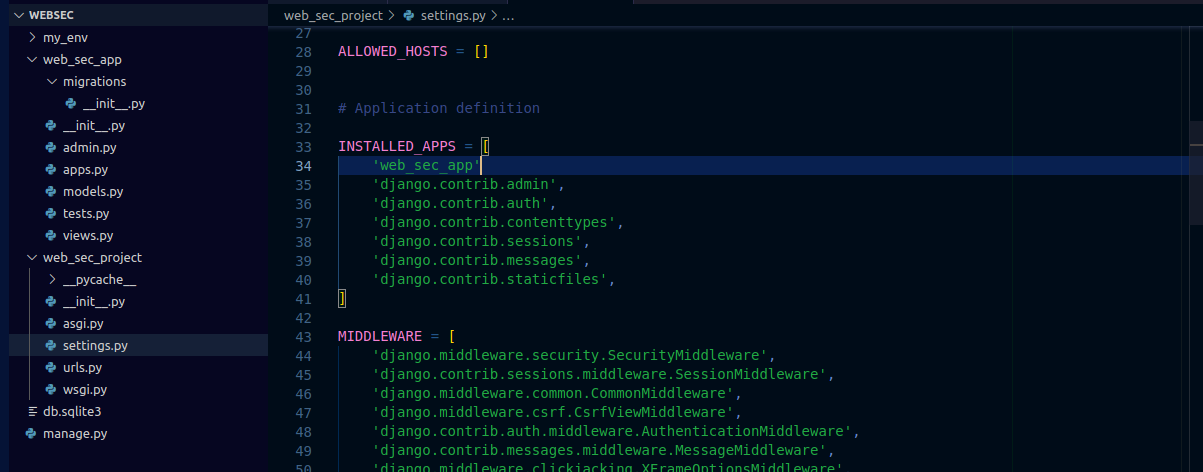
Проверьте, что ваше приложение добавлено
Теперь приступим к построению и реализации веб-безопасности.
Хеширование пароля
Первой линией обороны при реализации веб-безопасности является обеспечение надлежащей защиты паролей пользователей. И вместо того чтобы хранить пароли в открытом виде, целесообразно их хэшировать. Мы будем использовать криптографическое хеширование для защиты конфиденциальной пользовательской информации.
Криптографическое хеширование, также известное как хеш-функции или хеш-алгоритмы, является фундаментальной концепцией в криптографии и компьютерной безопасности. Она предполагает получение входного сигнала (или "сообщения") и его преобразование в строку символов фиксированного размера, которая обычно представляет собой последовательность цифр и букв. Полученный результат называется "хэш-значением" или "хэш-кодом"
Django по умолчанию предоставляет механизм безопасного хэширования паролей, используя алгоритм PBKDF2 с хэшем SHA-256.
Джанго использует надежный и безопасный механизм хеширования паролей для защиты пользовательских паролей. Этот механизм позволяет гарантировать, что даже в случае взлома базы данных злоумышленники не смогут легко получить пароли пользователей в открытом виде. Механизм хеширования паролей в Django состоит из PBKDF2.
PBKDF2 - простая функция выведения криптографических ключей, устойчивая ксловарным атакам иатакам на радужные таблицы. Она основана на многократном итеративном выведении HMAC с некоторой прокладкой. Это гарантирует, что даже если база данных будет взломана, пароли останутся нечитаемыми.
Для демонстрации этого мы создадим нового пользователя с хэшированным паролем и сохраним пользователя с хэшированным паролем в базе данных.
Сначала мы импортируем User из модели User. Затем импортируем make_password. Вот код для этого:
#web_sec_app/views.py

from django.contrib.auth.hashers import make_password
from django.contrib.auth.models import User

# Create User views here.
def UserView(request):
    users = User.objects.all()
    password = 'password'
    hashed_password = make_password(password)
    return render(request, 'create_user.html',
                {'users': users, 'hashed_password': hashed_password})
В нашем файле views.py мы создадим функцию, которая будет создавать нового пользователя с хэшированным паролем и сохранять пользователя с хэшированным паролем в базе данных.
Безопасное управление сеансами
Управление сессиями является ключевым моментом для сохранения состояния пользователя при многократных запросах. Django поставляется со встроенной системой управления сессиями, которая хранит данные о сеансах на стороне сервера. Мы обеспечим шифрование данных сеанса и защиту идентификатора сеанса для предотвращения атак перехвата сеанса.
Для обеспечения безопасного управления сеансами мы убедимся, что у нас есть куки защищенного сеанса, для чего потребуется HTTPS. Мы также собираемся предотвратить JavaScript доступ к куки сессии. Срок действия сессии истекает при закрытии браузера.
SESSION_COOKIE_SECURE = True
Этот параметр указывает Django отправлять сессионный cookie только через HTTPS-соединения. При установке значения True сессионный cookie не будет отправляться по незашифрованным HTTP-соединениям. Это важно для защиты конфиденциальных данных сессии, таких как токены аутентификации пользователя, от перехвата злоумышленниками в незащищенных сетях.
SESSION_COOKIE_HTTPONLY = True
Установка SESSION_COOKIE_HTTPONLY на True обеспечивает дополнительный уровень безопасности. При этом сеансовый cookie не может быть доступен JavaScript-коду, выполняющемуся в браузере клиента. Это позволяет предотвратить некоторые типы межсайтовых скриптовых атак (XSS), когда злоумышленник пытается похитить данные сеанса с помощью вредоносных скриптов.
SESSION_EXPIRE_AT_BROWSER_CLOSE = True
При установке SESSION_EXPIRE_AT_BROWSER_CLOSE в значение True сессия истечет и будет удалена, как только пользователь закроет свой браузер. Это обеспечивает механизм создания недолговечных сессий, которые автоматически завершаются, когда пользователь заканчивает сеанс просмотра. Это полезно для сценариев, в которых необходимо обеспечить выход пользователей из системы при закрытии браузера, что повышает безопасность общих или публичных компьютеров.
Ваш файл settings.py должен содержать следующее:
SESSION_COOKIE_SECURE = True
SESSION_COOKIE_HTTPONLY = True
SESSION_EXPIRE_AT_BROWSER_CLOSE = True
Аутентификация и авторизация
Правильные процедуры аутентификации и авторизации важны для ограничения доступа к определенным частям веб-приложения.
В этом разделе я покажу, как реализовать вход и аутентификацию пользователей с помощью фреймворка аутентификации Django. Я также определю контроль доступа на основе ролей пользователей, чтобы гарантировать, что только авторизованные пользователи могут получить доступ к определенным представлениям и функциям.
@user_passes_test(lambda u: u.is_superuser)
def admin(request):
    return render(request, 'admin.html', {'username': request.user.username})
Приведенный выше код используется для ограничения доступа к представлению администратора в зависимости от того, является ли пользователь суперпользователем (администратором) или нет.
<<<Если пользователь является суперпользователем, то ему разрешен доступ к представлению, и шаблон admin.html отображается с его именем пользователя. Если пользователь не является суперпользователем, то он будет перенаправлен на неавторизованное представление по умолчанию, если не реализована дополнительная обработка.
Это гарантирует, что только авторизованные пользователи с правами администратора смогут получить доступ к странице 'admin.html'.
Защита от межсайтового скриптинга (XSS)
Межсайтовый скриптинг (XSS) - это распространенная уязвимость, позволяющая хакерам внедрять вредоносные скрипты на веб-страницы, просматриваемые другими пользователями.
В этом разделе мы рассмотрим, как реализовать заголовки Content Security Policy (CSP) для предотвращения несанкционированного выполнения сценариев и защиты нашего приложения от XSS-атак.
Заголовки
CSP работают путем создания набора правил, определяющих, какие источники контента разрешены, а какие заблокированы. Это значительно уменьшает площадь атаки для XSS-уязвимостей, что значительно затрудняет выполнение злоумышленниками несанкционированных сценариев в вашем приложении.
Важно тщательно настроить политики CSP, чтобы найти баланс между безопасностью и функциональностью, так как слишком жесткие политики могут нарушить легитимную функциональность приложения.
CSP_DEFAULT_SRC = ("'self'",)
Защита от подделки межсайтовых запросов (CSRF)
Атаки
CSRF возникают, когда вредоносные сайты обманом заставляют пользователей совершать несанкционированные действия на других сайтах, где они аутентифицированы. Django предлагает встроенную защиту от CSRF-атак с помощью CSRF-токенов.
Это один из наиболее распространенных методов, используемых для предотвращения CSRF-атак с помощью CSRF-токенов.
Когда пользователь загружает веб-страницу, требующую взаимодействия с пользователем, сервер генерирует уникальный токен и включает его в форму или данные запроса. Этот токен обычно ассоциируется с сессией пользователя. Когда пользователь отправляет форму или инициирует действие, сервер проверяет, совпадает ли отправленный маркер с маркером, связанным с сессией пользователя. Если они не совпадают, запрос отклоняется, так как это может быть попытка совершить CSRF-атаку.
Я покажу вам, как включать эти маркеры в формы для предотвращения несанкционированных запросов.
<h4>Create Account</h4>
<form action="{% url 'create_user' %}" method="post">
   {% csrf_token %}
   <input
      type="text"
      id="userName"
      name="username"
      class="form-control input-sm chat-input"
      placeholder="username"
    />
</form>
Предотвращение SQL-инъекций
SQL injection - серьезная уязвимость, возникающая, когда злоумышленники манипулируют пользовательским вводом для выполнения вредоносных SQL-запросов к базе данных. Я продемонстрирую, как ORM (Object-Relational Mapping) в Django автоматически санирует пользовательский ввод и защищает от атак SQL-инъекций.
Важно отметить, что, несмотря на то, что ORM в Django обеспечивает надежную защиту от большинства атак SQL-инъекций, разработчики все равно должны придерживаться лучших практик безопасности, таких как валидация ввода и проверка авторизации, чтобы гарантировать общую безопасность своих веб-приложений.
Также нелишним будет часто обновлять Django и его зависимости, чтобы воспользоваться всеми обновлениями безопасности или другими улучшениями, которые могут быть выпущены в будущем.
def search(request):
    query = request.GET.get('q')
    if query is not None:
        results = Search.objects.filter(Q(name__icontains=query) | Q(description__icontains=query))
    else:
        results = []
    return render(request, 'search.html', {'results': results})
Приведенный код определяет функцию представления Django, которая работает с функцией поиска, извлекая запрос из параметров запроса GET, используя этот запрос для выполнения поиска в модели Search с помощью метода фильтра Django ORM, а затем отображая шаблон с результатами поиска.
Поиск осуществляется по полям 'name' и 'description' модели, а результатом поиска являются частичные совпадения без учета регистра.
Полагаясь на ORM Django и его встроенные возможности, вы используете более высокий уровень абстракции, который по своей сути помогает предотвратить распространенные уязвимости SQL-инъекций.
Структура и шаблоны использования этого кода соответствуют лучшим практикам написания безопасных запросов в Django, что делает его менее восприимчивым к атакам SQL-инъекций. Но все же важно убедиться, что остальная часть вашей кодовой базы следует лучшим практикам безопасности и что вы постоянно обновляете версию Django и зависимости, чтобы воспользоваться последними исправлениями безопасности.
Безопасность загрузки файлов
Обработка загрузки файлов требует особого внимания для предотвращения загрузки злоумышленниками вредоносных файлов. Мы рассмотрим, как подтвердить и ограничить загрузку файлов для обеспечения безопасности нашего веб-приложения.
def upload_file(request):
    if request.method == 'POST':
        uploaded_file = request.FILES.get('file')
        if uploaded_file:
            if uploaded_file.content_type in ALLOWED_FILE_EXTENSIONS:
                try:
                    with open('uploads/' + uploaded_file.name, 'wb+') as destination:
                        for chunk in uploaded_file.chunks():
                            destination.write(chunk)
                    return render(request, 'success.html')
                except ValidationError as e:
                    error_message = str(e)
                    return render(request, 'fileUpload.html', {'error_message': error_message})
            else:
                error_message = "Invalid file type."
                return render(request, 'fileUpload.html', {'error_message': error_message})
        else:
            error_message = "No file selected."
            return render(request, 'fileUpload.html', {'error_message': error_message})
    else:
        return render(request, 'fileUpload.html')
В приведенном фрагменте кода определена функция upload_file Эта функция принимает в качестве аргумента объект request и обрабатывает загрузку файлов.
Сначала функция проверяет, является ли метод запроса POST. Если да, то функция получает файл, загруженный пользователем с помощью метода request.FILES.get('file').
Если файл не пуст, то функция проверяет, есть ли расширение файла в списке ALLOWED_FILE_EXTENSIONS. Этот список содержит типы файлов, которые разрешено загружать. Если расширение файла отсутствует в списке, то функция выводит сообщение об ошибке.
<<<Если расширение файла находится в списке, то функция пытается сохранить файл в каталог с именем uploads. Функция использует оператор with open() для открытия файла в режиме двоичной записи. Затем файл сохраняется фрагментами с помощью цикла for chunk in file.chunks().
Если файл сохранен успешно, то функция перенаправляет пользователя на страницу успеха. В противном случае выдается сообщение об ошибке.
Список ALLOWED_FILE_EXTENSIONS - это мера безопасности, которая не позволяет пользователям загружать вредоносные файлы, такие как исполняемые файлы или скрипты. Ограничение максимального размера файла - еще одна мера безопасности, не позволяющая пользователям загружать файлы большого размера, которые могут вызвать атаку типа "отказ в обслуживании". Хранение загружаемого файла в отдельном каталоге изолирует его от остальной части приложения и затрудняет доступ к нему злоумышленников.
Итоги
Создание безопасного веб-приложения - это непрерывный процесс, требующий бдительности и внедрения передовых методов работы.
В этой статье я на примерах кода продемонстрировал различные меры веб-безопасности при создании веб-приложения с использованием Django.
Реализовав хеширование паролей, безопасное управление сеансами, аутентификацию, авторизацию и защиту от таких распространенных веб-уязвимостей, как XSS и CSRF, я сделал важные шаги на пути к созданию надежного и безопасного веб-приложения.
Однако веб-безопасность - это обширная и постоянно развивающаяся область, и очень важно быть в курсе последних тенденций и практик в области безопасности, чтобы гарантировать, что ваше веб-приложение не подвергнется потенциальным угрозам. Всегда проводите тщательное тестирование безопасности и регулярно обновляйте свои приложения и библиотеки, чтобы обеспечить надежную защиту от потенциальных атак.
При правильном подходе к обеспечению безопасности вы можете уверенно предоставлять своим пользователям надежную и безопасную работу в Интернете.
Вы можете получить доступ к коду здесь. Спасибо за чтение!
Вернуться на верх