Начало работы с каналами Django
Оглавление
- Цели
- Начало работы
- WebSockets 101
- Потребители и группы
- Аутентификация пользователя
- Оповещения о входе
- Проверка на вменяемость
- Заключительные мысли
В этом уроке мы будем использовать Django Channels для создания приложения реального времени, которое обновляет список пользователей по мере их входа и выхода.
Благодаря WebSockets (через Django Channels), управляющим взаимодействием между клиентом и сервером, при аутентификации пользователя событие будет транслироваться всем остальным подключенным пользователям. Экран каждого пользователя будет меняться автоматически, без необходимости перезагрузки браузера.
ПРИМЕЧАНИЕ: Перед началом работы над этим руководством рекомендуется иметь некоторый опыт работы с Django. Кроме того, вы должны быть знакомы с концепцией WebSockets.
В нашем приложении используются:
- Python (v3.6.0)
- Django (v1.10.5)
- Django Channels (v1.0.3)
- Redis (v3.2.8)
Цели
К концу этого учебного курса вы сможете...
- Добавить поддержку Web-сокетов в проект Django через Django Channels
- Установите простое соединение между Django и сервером Redis
- Введите базовую аутентификацию пользователей
- Используйте сигналы Django для выполнения действий при входе или выходе пользователя
Начало работы
Сначала создадим новую виртуальную среду для изоляции зависимостей нашего проекта:
$ mkdir django-example-channels
$ cd django-example-channels
$ python3.6 -m venv env
$ source env/bin/activate
(env)$
Установите Django, Django Channels и ASGI Redis, а затем создайте новый проект Django и приложение:
(env)$ pip install django==1.10.5 channels==1.0.2 asgi_redis==1.0.0
(env)$ django-admin.py startproject example_channels
(env)$ cd example_channels
(env)$ python manage.py startapp example
(env)$ python manage.py migrate
ПРИМЕЧАНИЕ: В ходе работы над этим учебником мы будем создавать множество различных файлов и папок. При возникновении затруднений обращайтесь к структуре папок из репозитория проекта.
Далее загрузите и установите Redis. Если вы работаете на Mac, мы рекомендуем использовать Homebrew:
$ brew install redis
Запустите сервер Redis в новом окне терминала и убедитесь, что он работает на порту по умолчанию, 6379. Номер порта будет важен, когда мы будем указывать Django, как взаимодействовать с Redis.
Завершите настройку, обновив INSTALLED_APPS в settings.py файл проекта:
INSTALLED_APPS = [
    'django.contrib.admin',
    'django.contrib.auth',
    'django.contrib.contenttypes',
    'django.contrib.sessions',
    'django.contrib.messages',
    'django.contrib.staticfiles',
    'channels',
    'example',
]
Затем настройте CHANNEL_LAYERS, установив бэкенд и маршрутизацию по умолчанию:
CHANNEL_LAYERS = {
    'default': {
        'BACKEND': 'asgi_redis.RedisChannelLayer',
        'CONFIG': {
            'hosts': [('localhost', 6379)],
        },
        'ROUTING': 'example_channels.routing.channel_routing',
    }
}
Здесь используется бэкэнд Redis, который также необходим в продакшене.
WebSockets 101
Обычно Django использует HTTP для связи между клиентом и сервером:
- Клиент отправляет HTTP-запрос на сервер.
- Django разбирает запрос, извлекает URL, а затем сопоставляет его с представлением.
- Представление обрабатывает запрос и возвращает клиенту HTTP-ответ.
В отличие от HTTP, протокол WebSockets допускает двунаправленное взаимодействие, то есть сервер может передавать данные клиенту без запроса со стороны пользователя. При использовании HTTP ответ получает только тот клиент, который сделал запрос. С помощью WebSockets сервер может взаимодействовать с несколькими клиентами одновременно. Как мы увидим далее в этом учебнике, для отправки сообщений WebSockets используется префикс ws://, в отличие от http://.
ПРИМЕЧАНИЕ: Перед тем как погрузиться в эту тему, быстро просмотрите документацию "Концепции каналов".
Потребители и группы
Давайте создадим наш первый потребитель, который будет обрабатывать основные соединения между клиентом и сервером. Создайте новый файл с именем example_channels/example/consumers.py:
from channels import Group


def ws_connect(message):
    Group('users').add(message.reply_channel)


def ws_disconnect(message):
    Group('users').discard(message.reply_channel)
Потребители - это аналог представлений в Django. Любой пользователь, подключившийся к нашему приложению, будет добавлен в группу "users" и будет получать сообщения, отправляемые сервером. Когда клиент отключается от нашего приложения, канал удаляется из группы, и пользователь перестает получать сообщения.
Далее настроим маршруты, которые работают практически так же, как и конфигурация URL в Django, добавив следующий код в новый файл example_channels/routing.py:
from channels.routing import route
from example.consumers import ws_connect, ws_disconnect


channel_routing = [
    route('websocket.connect', ws_connect),
    route('websocket.disconnect', ws_disconnect),
]
Итак, мы определили channel_routing вместо urlpatterns и route() вместо url(). Обратите внимание, что мы связали наши потребительские функции с WebSockets.
Templates
Давайте напишем HTML, который может взаимодействовать с нашим сервером через WebSocket. Создадим папку "templates" внутри "example", а затем добавим папку "example" внутри "templates" - "example_channels/example/templates/example".
Добавить файл _base.html:
<!doctype html>
<html lang="en">
<head>
  <meta charset="utf-8">
  <meta name="viewport" content="width=device-width, user-scalable=no, initial-scale=1.0, maximum-scale=1.0, minimum-scale=1.0">
  <meta http-equiv="X-UA-Compatible" content="ie=edge">
  <link href="//maxcdn.bootstrapcdn.com/bootstrap/3.3.7/css/bootstrap.min.css" rel="stylesheet">
  <title>Example Channels</title>
</head>
<body>
  <div class="container">
    <br>
    {% block content %}{% endblock content %}
  </div>
  <script src="//code.jquery.com/jquery-3.1.1.min.js"></script>
  {% block script %}{% endblock script %}
</body>
</html>
И user_list.html:
{% extends 'example/_base.html' %}

{% block content %}{% endblock content %}

{% block script %}
  <script>
    var socket = new WebSocket('ws://' + window.location.host + '/users/');

    socket.onopen = function open() {
      console.log('WebSockets connection created.');
    };

    if (socket.readyState == WebSocket.OPEN) {
      socket.onopen();
    }
  </script>
{% endblock script %}
Теперь, когда клиент успешно открывает соединение с сервером по WebSocket, мы увидим вывод подтверждающего сообщения на консоль.
Виды
Установите поддерживающее представление Django для визуализации нашего шаблона в example_channels/example/views.py:
from django.shortcuts import render


def user_list(request):
    return render(request, 'example/user_list.html')
Добавьте URL в example_channels/example/urls.py:
from django.conf.urls import url
from example.views import user_list


urlpatterns = [
    url(r'^$', user_list, name='user_list'),
]
Обновите также URL проекта в example_channels/example_channels/urls.py:
from django.conf.urls import include, url
from django.contrib import admin

urlpatterns = [
    url(r'^admin/', admin.site.urls),
    url(r'^', include('example.urls', namespace='example')),
]
Test
Готовы ли вы к тестированию?
(env)$ python manage.py runserver
ПРИМЕЧАНИЕ: В качестве альтернативы можно запустить
python manage.py runserver --noworkerиpython manage.py runworkerв двух разных терминалах, чтобы протестировать интерфейс и рабочие серверы как два отдельных процесса. Оба метода работают!
При посещении сайта http://localhost:8000/ на терминал должно быть выведено сообщение о подключении:
[2017/02/19 23:24:57] HTTP GET / 200 [0.02, 127.0.0.1:52757]
[2017/02/19 23:24:58] WebSocket HANDSHAKING /users/ [127.0.0.1:52789]
[2017/02/19 23:25:03] WebSocket DISCONNECT /users/ [127.0.0.1:52789]
Аутентификация пользователя
Теперь, когда мы доказали, что можем открыть соединение, следующим шагом будет аутентификация пользователя. Помните: Мы хотим, чтобы пользователь мог войти в наше приложение и увидеть список всех других пользователей, подписанных на его группу. Прежде всего, нам нужен способ создания учетных записей и входа пользователей в систему. Начнем с создания простой страницы входа, которая позволит пользователю аутентифицироваться с помощью имени пользователя и пароля.
Создайте новый файл с именем log_in.html внутри "example_channels/example/templates/example":
{% extends 'example/_base.html' %}

{% block content %}
  <form action="{% url 'example:log_in' %}" method="post">
    {% csrf_token %}
    {% for field in form %}
      <div>
        {{ field.label_tag }}
        {{ field }}
      </div>
    {% endfor %}
    <button type="submit">Log in</button>
  </form>
  <p>Don't have an account? <a href="{% url 'example:sign_up' %}">Sign up!</a></p>
{% endblock content %}
Далее обновляем example_channels/example/views.py следующим образом:
from django.contrib.auth import login, logout
from django.contrib.auth.forms import AuthenticationForm
from django.core.urlresolvers import reverse
from django.shortcuts import render, redirect


def user_list(request):
    return render(request, 'example/user_list.html')


def log_in(request):
    form = AuthenticationForm()
    if request.method == 'POST':
        form = AuthenticationForm(data=request.POST)
        if form.is_valid():
            login(request, form.get_user())
            return redirect(reverse('example:user_list'))
        else:
            print(form.errors)
    return render(request, 'example/log_in.html', {'form': form})


def log_out(request):
    logout(request)
    return redirect(reverse('example:log_in'))
Django поставляется с формами, поддерживающими общую функциональность аутентификации. Мы можем использовать AuthenticationForm для обработки входа пользователя в систему. Эта форма проверяет введенные имя пользователя и пароль, а затем возвращает объект User, если найден подтвержденный пользователь. Мы регистрируем подтвержденного пользователя и перенаправляем его на нашу домашнюю страницу. Пользователь также должен иметь возможность выйти из приложения, поэтому мы создаем представление logout, которое обеспечивает эту функциональность и возвращает пользователя на экран входа в систему.
Затем обновить example_channels/example/urls.py:
from django.conf.urls import url
from example.views import log_in, log_out, user_list


urlpatterns = [
    url(r'^log_in/$', log_in, name='log_in'),
    url(r'^log_out/$', log_out, name='log_out'),
    url(r'^$', user_list, name='user_list')
]
Нам также необходим способ создания новых пользователей. Создайте страницу регистрации по аналогии со входом в систему, добавив новый файл sign_up.html в файл "example_channels/example/templates/example":
{% extends 'example/_base.html' %}

{% block content %}
  <form action="{% url 'example:sign_up' %}" method="post">
    {% csrf_token %}
    {% for field in form %}
      <div>
        {{ field.label_tag }}
        {{ field }}
      </div>
    {% endfor %}
    <button type="submit">Sign up</button>
    <p>Already have an account? <a href="{% url 'example:log_in' %}">Log in!</a></p>
  </form>
{% endblock content %}
Обратите внимание, что на странице входа в систему есть ссылка на страницу регистрации, а на странице регистрации есть обратная ссылка на страницу входа в систему.
Добавьте в представления следующую функцию:
def sign_up(request):
    form = UserCreationForm()
    if request.method == 'POST':
        form = UserCreationForm(data=request.POST)
        if form.is_valid():
            form.save()
            return redirect(reverse('example:log_in'))
        else:
            print(form.errors)
    return render(request, 'example/sign_up.html', {'form': form})
Для создания пользователя мы используем другую встроенную форму. После успешной валидации формы мы перенаправляем на страницу входа в систему.
Обязательно импортируйте форму:
from django.contrib.auth.forms import AuthenticationForm, UserCreationForm
Обновление example_channels/example/urls.py снова:
from django.conf.urls import url
from example.views import log_in, log_out, sign_up, user_list


urlpatterns = [
    url(r'^log_in/$', log_in, name='log_in'),
    url(r'^log_out/$', log_out, name='log_out'),
    url(r'^sign_up/$', sign_up, name='sign_up'),
    url(r'^$', user_list, name='user_list')
]
На данном этапе нам необходимо создать пользователя. Запустите сервер и откройте в браузере страницу http://localhost:8000/sign_up/. Заполните форму правильным именем пользователя и паролем и отправьте ее, чтобы создать нашего первого пользователя.
NOTE: Попробуйте использовать
michaelв качестве имени пользователя иjohnson123в качестве пароля.
Представление sign_up перенаправляет нас на представление log_in, и оттуда мы можем аутентифицировать нашего только что созданного пользователя.
После входа в систему мы можем протестировать наши новые представления аутентификации.
Используйте форму регистрации для создания нескольких новых пользователей в рамках подготовки к следующему разделу.
Оповещения о входе
У нас работает базовая аутентификация пользователей, но нам все еще нужно отображать список пользователей, и нам нужно, чтобы сервер сообщал группе, когда пользователь входит и выходит из системы. Нам необходимо изменить наши потребительские функции таким образом, чтобы они отправляли сообщение сразу после подключения клиента и перед его отключением. Данные сообщения будут включать имя пользователя и статус подключения.
Обновление example_channels/example/consumers.py выглядит так:
import json
from channels import Group
from channels.auth import channel_session_user, channel_session_user_from_http


@channel_session_user_from_http
def ws_connect(message):
    Group('users').add(message.reply_channel)
    Group('users').send({
        'text': json.dumps({
            'username': message.user.username,
            'is_logged_in': True
        })
    })


@channel_session_user
def ws_disconnect(message):
    Group('users').send({
        'text': json.dumps({
            'username': message.user.username,
            'is_logged_in': False
        })
    })
    Group('users').discard(message.reply_channel)
Обратите внимание, что мы добавили декораторы в функции для получения пользователя из сессии Django. Кроме того, все сообщения должны быть JSON-сериализуемыми, поэтому мы выгружаем наши данные в JSON-строку.
Далее обновляем example_channels/example/templates/example/user_list.html:
{% extends 'example/_base.html' %}

{% block content %}
  <a href="{% url 'example:log_out' %}">Log out</a>
  <br>
  <ul>
    {% for user in users %}
      <!-- NOTE: We escape HTML to prevent XSS attacks. -->
      <li data-username="{{ user.username|escape }}">
        {{ user.username|escape }}: {{ user.status|default:'Offline' }}
      </li>
    {% endfor %}
  </ul>
{% endblock content %}

{% block script %}
  <script>
    var socket = new WebSocket('ws://' + window.location.host + '/users/');

    socket.onopen = function open() {
      console.log('WebSockets connection created.');
    };

    socket.onmessage = function message(event) {
      var data = JSON.parse(event.data);
      // NOTE: We escape JavaScript to prevent XSS attacks.
      var username = encodeURI(data['username']);
      var user = $('li').filter(function () {
        return $(this).data('username') == username;
      });

      if (data['is_logged_in']) {
        user.html(username + ': Online');
      }
      else {
        user.html(username + ': Offline');
      }
    };

    if (socket.readyState == WebSocket.OPEN) {
      socket.onopen();
    }
  </script>
{% endblock script %}
На главной странице сайта мы расширяем список пользователей, чтобы отобразить список пользователей. Мы храним имя пользователя в качестве атрибута data, чтобы легко находить элемент пользователя в DOM. Мы также добавляем к WebSocket слушатель событий, который может обрабатывать сообщения с сервера. Когда мы получаем сообщение, мы разбираем данные JSON, находим элемент <li> для данного пользователя и обновляем его статус.
Django не отслеживает, вошел ли пользователь в систему, поэтому нам необходимо создать простую модель, которая будет делать это за нас. Создадим модель LoggedInUser с односторонней связью с нашей моделью User в example_channels/example/models.py:
from django.conf import settings
from django.db import models


class LoggedInUser(models.Model):
    user = models.OneToOneField(
        settings.AUTH_USER_MODEL, related_name='logged_in_user')
Наше приложение будет создавать экземпляр LoggedInUser при входе пользователя в систему, и удалять его при выходе пользователя из системы.
Выполните миграцию схемы, а затем выполните миграцию нашей базы данных для применения изменений.
(env)$ python manage.py makemigrations
(env)$ python manage.py migrate
Далее обновляем представление списка пользователей в файле example_channels/example/views.py, чтобы получить список пользователей для визуализации:
from django.contrib.auth import get_user_model, login, logout
from django.contrib.auth.decorators import login_required
from django.contrib.auth.forms import AuthenticationForm, UserCreationForm
from django.core.urlresolvers import reverse
from django.shortcuts import render, redirect


User = get_user_model()


@login_required(login_url='/log_in/')
def user_list(request):
    """
    NOTE: This is fine for demonstration purposes, but this should be
    refactored before we deploy this app to production.
    Imagine how 100,000 users logging in and out of our app would affect
    the performance of this code!
    """
    users = User.objects.select_related('logged_in_user')
    for user in users:
        user.status = 'Online' if hasattr(user, 'logged_in_user') else 'Offline'
    return render(request, 'example/user_list.html', {'users': users})


def log_in(request):
    form = AuthenticationForm()
    if request.method == 'POST':
        form = AuthenticationForm(data=request.POST)
        if form.is_valid():
            login(request, form.get_user())
            return redirect(reverse('example:user_list'))
        else:
            print(form.errors)
    return render(request, 'example/log_in.html', {'form': form})


@login_required(login_url='/log_in/')
def log_out(request):
    logout(request)
    return redirect(reverse('example:log_in'))


def sign_up(request):
    form = UserCreationForm()
    if request.method == 'POST':
        form = UserCreationForm(data=request.POST)
        if form.is_valid():
            form.save()
            return redirect(reverse('example:log_in'))
        else:
            print(form.errors)
    return render(request, 'example/sign_up.html', {'form': form})
Если у пользователя есть ассоциированный LoggedInUser, то мы записываем статус пользователя как "Online", а если нет, то "Offline". Мы также добавляем декоратор @login_required в представления списка пользователей и выхода из системы, чтобы ограничить доступ только зарегистрированным пользователям.
Добавьте также импорт:
from django.contrib.auth import get_user_model, login, logout
from django.contrib.auth.decorators import login_required
На данный момент пользователи могут входить и выходить из системы, что вызовет отправку сервером сообщений клиенту, но у нас нет возможности узнать, какие пользователи вошли в систему, когда пользователь впервые входит в систему. Пользователь видит обновления только при изменении статуса другого пользователя. Здесь на помощь приходит LoggedInUser, но нам нужен способ создать экземпляр LoggedInUser при входе пользователя в систему, а затем удалить его при выходе пользователя из системы.
В библиотеке Django есть функция signals, которая транслирует уведомления о наступлении определенных действий. Приложения могут прослушивать эти уведомления и затем действовать в соответствии с ними. Мы можем использовать два полезных встроенных сигнала (user_logged_in и user_logged_out) для обработки нашего поведения LoggedInUser.
В каталоге "example_channels/example" добавьте новый файл с именем signals.py:
from django.contrib.auth import user_logged_in, user_logged_out
from django.dispatch import receiver
from example.models import LoggedInUser


@receiver(user_logged_in)
def on_user_login(sender, **kwargs):
    LoggedInUser.objects.get_or_create(user=kwargs.get('user'))


@receiver(user_logged_out)
def on_user_logout(sender, **kwargs):
    LoggedInUser.objects.filter(user=kwargs.get('user')).delete()
Мы должны сделать сигналы доступными в конфигурации нашего приложения, example_channels/example/apps.py:
from django.apps import AppConfig


class ExampleConfig(AppConfig):
    name = 'example'

    def ready(self):
        import example.signals
Обновление example_channels/example/__init__.py также:
default_app_config = 'example.apps.ExampleConfig'
Проверка на безумие
Теперь мы закончили кодирование и готовы подключиться к нашему серверу с несколькими пользователями для тестирования нашего приложения.
Запустите сервер Django, войдите в систему как пользователь и посетите домашнюю страницу. Мы должны увидеть список всех пользователей нашего приложения, каждый из которых имеет статус "Offline". Далее открываем новое окно Incognito, входим в него под другим пользователем и смотрим оба экрана. Сразу после входа в систему в обычном браузере статус пользователя обновляется до "Online". В нашем окне Incognito мы видим, что пользователь, вошедший в систему, также имеет статус "Online". Мы можем протестировать WebSockets, войдя в систему и выйдя из нее на разных устройствах под разными пользователями.
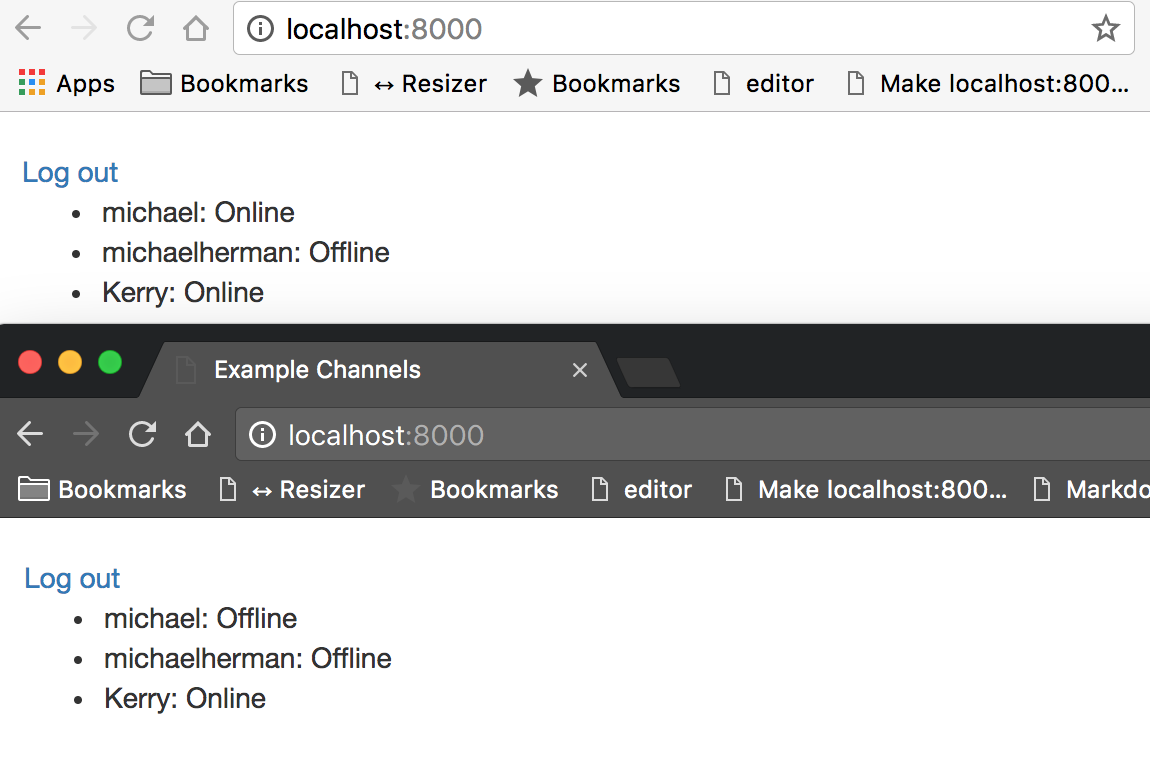
Наблюдая за консолью разработчика на клиенте и активностью сервера в нашем терминале, мы можем подтвердить, что WebSocket-соединения формируются при входе пользователя в систему и разрушаются при выходе из нее.
[2017/02/20 00:15:23] HTTP POST /log_in/ 302 [0.07, 127.0.0.1:55393]
[2017/02/20 00:15:23] HTTP GET / 200 [0.04, 127.0.0.1:55393]
[2017/02/20 00:15:23] WebSocket HANDSHAKING /users/ [127.0.0.1:55414]
[2017/02/20 00:15:23] WebSocket CONNECT /users/ [127.0.0.1:55414]
[2017/02/20 00:15:25] HTTP GET /log_out/ 302 [0.01, 127.0.0.1:55393]
[2017/02/20 00:15:26] HTTP GET /log_in/ 200 [0.02, 127.0.0.1:55393]
[2017/02/20 00:15:26] WebSocket DISCONNECT /users/ [127.0.0.1:55414]
NOTE: Вы также можете использовать ngrok для безопасного доступа локального сервера в Интернет. Это позволит обращаться к локальному серверу с различных устройств, например с телефона или планшета.
Заключительные мысли
В этом уроке мы рассмотрели многое - каналы Django, WebSockets, аутентификацию пользователей, сигналы, а также немного front-end разработки. Главное, что мы вынесли для себя: Channels расширяет функциональность традиционного Django-приложения, позволяя передавать сообщения с сервера группам пользователей через WebSockets.
Это мощный материал!
Подумайте о некоторых вариантах применения. Мы можем создавать чаты, многопользовательские игры и приложения для совместной работы, позволяющие пользователям общаться в режиме реального времени. С помощью WebSockets улучшаются даже рутинные задачи. Например, вместо того чтобы периодически опрашивать сервер на предмет завершения длительной задачи, сервер может отправить клиенту обновление статуса по ее завершении.
В этом руководстве лишь поверхностно рассмотрено то, что можно сделать с помощью каналов Django. Изучите документацию Django Channels и посмотрите, что еще вы можете создать.
Захватите финальный код из репозитория django-example-channels. Будьте здоровы!
Вернуться на верх