Как подключить виджет выбора даты в Django
Из этого руководства вы узнаете как легко подключить виджет выбора даты в своем проекте Django.
Мы узнаем, как установить его вручную, потом как настроить пользовательский виджет и, наконец, как использовать стороннее приложение Django с поддержкой средств выбора даты и времени.
Вступление
Внедрение средства выбора даты в основном выполняется на стороне пользователя.
Ключевой частью реализации является обеспечение того, что Django получит введенное значение даты в правильном формате, а также что Django сможет воспроизводить формат при визуализации формы с исходными данными.
Мы также можем использовать пользовательские виджеты, чтобы обеспечить более глубокую интеграцию между внешним и внутренним интерфейсом, а также способствовать лучшему повторному использованию в проекте.
В следующих разделах мы изучим следующие виджеты выбора дат:
Tempus Dominus Bootstrap 4
XDSoft DateTimePicker
Fengyuan Chen’s Datepicker
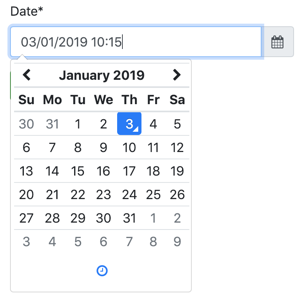
Tempus Dominus Bootstrap 4
Это отличная библиотека JavaScript, которая хорошо интегрируется с Bootstrap 4. Недостатком является то, что для нее требуются moment.js и что-то вроде Font-Awesome для иконок.
Использовать эту библиотеку имеет смысл только тогда, когда вы уже используете Bootstrap 4 + jQuery, в противном случае список CSS и JS может выглядеть несколько перегруженным.
Чтобы установить его, вы можете использовать их CDN или загрузить последнюю версию с GitHub.
Если вы загрузили код со страницы релизов, возьмите готовый код из папки build/.
Ниже приведен статический HTML-пример средства выбора даты:
<!doctype html>
<html lang="en">
  <head>
    <meta charset="utf-8">
    <meta name="viewport" content="width=device-width, initial-scale=1, shrink-to-fit=no">
    <title>Static Example</title>

    <!-- Bootstrap 4 -->
    <link rel="stylesheet" href="https://stackpath.bootstrapcdn.com/bootstrap/4.2.1/css/bootstrap.min.css" integrity="sha384-GJzZqFGwb1QTTN6wy59ffF1BuGJpLSa9DkKMp0DgiMDm4iYMj70gZWKYbI706tWS" crossorigin="anonymous">
    <script src="https://code.jquery.com/jquery-3.3.1.slim.min.js" integrity="sha384-q8i/X+965DzO0rT7abK41JStQIAqVgRVzpbzo5smXKp4YfRvH+8abtTE1Pi6jizo" crossorigin="anonymous"></script>
    <script src="https://cdnjs.cloudflare.com/ajax/libs/popper.js/1.14.6/umd/popper.min.js" integrity="sha384-wHAiFfRlMFy6i5SRaxvfOCifBUQy1xHdJ/yoi7FRNXMRBu5WHdZYu1hA6ZOblgut" crossorigin="anonymous"></script>
    <script src="https://stackpath.bootstrapcdn.com/bootstrap/4.2.1/js/bootstrap.min.js" integrity="sha384-B0UglyR+jN6CkvvICOB2joaf5I4l3gm9GU6Hc1og6Ls7i6U/mkkaduKaBhlAXv9k" crossorigin="anonymous"></script>

    <!-- Font Awesome -->
    <link href="https://stackpath.bootstrapcdn.com/font-awesome/4.7.0/css/font-awesome.min.css" rel="stylesheet" integrity="sha384-wvfXpqpZZVQGK6TAh5PVlGOfQNHSoD2xbE+QkPxCAFlNEevoEH3Sl0sibVcOQVnN" crossorigin="anonymous">

    <!-- Moment.js -->
    <script src="https://cdnjs.cloudflare.com/ajax/libs/moment.js/2.23.0/moment.min.js" integrity="sha256-VBLiveTKyUZMEzJd6z2mhfxIqz3ZATCuVMawPZGzIfA=" crossorigin="anonymous"></script>

    <!-- Tempus Dominus Bootstrap 4 -->
    <link rel="stylesheet" href="https://cdnjs.cloudflare.com/ajax/libs/tempusdominus-bootstrap-4/5.1.2/css/tempusdominus-bootstrap-4.min.css" integrity="sha256-XPTBwC3SBoWHSmKasAk01c08M6sIA5gF5+sRxqak2Qs=" crossorigin="anonymous" />
    <script src="https://cdnjs.cloudflare.com/ajax/libs/tempusdominus-bootstrap-4/5.1.2/js/tempusdominus-bootstrap-4.min.js" integrity="sha256-z0oKYg6xiLq3yJGsp/LsY9XykbweQlHl42jHv2XTBz4=" crossorigin="anonymous"></script>

  </head>
  <body>

    <div class="input-group date" id="datetimepicker1" data-target-input="nearest">
      <input type="text" class="form-control datetimepicker-input" data-target="#datetimepicker1"/>
      <div class="input-group-append" data-target="#datetimepicker1" data-toggle="datetimepicker">
        <div class="input-group-text"><i class="fa fa-calendar"></i></div>
      </div>
    </div>

    <script>
      $(function () {
        $("#datetimepicker1").datetimepicker();
      });
    </script>

  </body>
</html>
Прямое использование
Теперь задача состоит в том, чтобы этот входной фрагмент был интегрирован с формой Django.
forms.py
from django import forms

class DateForm(forms.Form):
    date = forms.DateTimeField(
        input_formats=['%d/%m/%Y %H:%M'],
        widget=forms.DateTimeInput(attrs={
            'class': 'form-control datetimepicker-input',
            'data-target': '#datetimepicker1'
        })
    )
Шаблон
<div class="input-group date" id="datetimepicker1" data-target-input="nearest">
  {{ form.date }}
  <div class="input-group-append" data-target="#datetimepicker1" data-toggle="datetimepicker">
    <div class="input-group-text"><i class="fa fa-calendar"></i></div>
  </div>
</div>

<script>
  $(function () {
    $("#datetimepicker1").datetimepicker({
      format: 'DD/MM/YYYY HH:mm',
    });
  });
</script>
Скрипт может быть размещен где угодно, потому что фрагмент $ (function () {...}); запустит инициализацию datetimepicker, когда страница будет готова. Единственное требование заключается в том, чтобы этот скрипт помещался после подключения jQuery.
Пользовательский виджет
Вы можете создать виджет в любом приложении, которое захотите, здесь рассмотрим приложение Django с именем core.
core/widgets.py
from django.forms import DateTimeInput

class BootstrapDateTimePickerInput(DateTimeInput):
    template_name = 'widgets/bootstrap_datetimepicker.html'

    def get_context(self, name, value, attrs):
        datetimepicker_id = 'datetimepicker_{name}'.format(name=name)
        if attrs is None:
            attrs = dict()
        attrs['data-target'] = '#{id}'.format(id=datetimepicker_id)
        attrs['class'] = 'form-control datetimepicker-input'
        context = super().get_context(name, value, attrs)
        context['widget']['datetimepicker_id'] = datetimepicker_id
        return context
В приведенной выше реализации мы генерируем уникальный идентификатор datetimepicker_id и также включаем его в контекст виджета.
Затем реализация внешнего интерфейса выполняется внутри фрагмента HTML-кода виджета.
widgets/bootstrap_datetimepicker.html
<div class="input-group date" id="{{ widget.datetimepicker_id }}" data-target-input="nearest">
  {% include "django/forms/widgets/input.html" %}
  <div class="input-group-append" data-target="#{{ widget.datetimepicker_id }}" data-toggle="datetimepicker">
    <div class="input-group-text"><i class="fa fa-calendar"></i></div>
  </div>
</div>

<script>
  $(function () {
    $("#{{ widget.datetimepicker_id }}").datetimepicker({
      format: 'DD/MM/YYYY HH:mm',
    });
  });
</script>
Обратите внимание, как мы используем встроенный шаблон django/forms/widgets/input.html.
Теперь использование:
core/forms.py
from .widgets import BootstrapDateTimePickerInput

class DateForm(forms.Form):
    date = forms.DateTimeField(
        input_formats=['%d/%m/%Y %H:%M'],
        widget=BootstrapDateTimePickerInput()
    )
А теперь просто отобразим поле:
Шаблон
{{ form.date }}
Хорошая новость состоит в том, что ваша форма может иметь несколько полей даты и используя виджет, вы можете просто визуализировать всю форму как:
<form method="post">
  {% csrf_token %}
  {{ form.as_p }}
  <input type="submit" value="Submit">
</form>
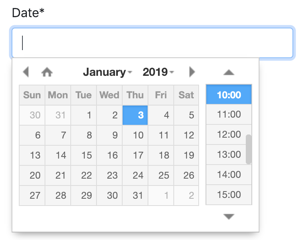
XDSoft DateTimePicker
XDSoft DateTimePicker — очень универсальный инструмент для выбора даты, который не зависит от moment.js или Bootstrap, хотя на веб-сайте с Bootstrap он выглядит неплохо.
Он прост в использовании. Вы можете скачать исходники с GitHub.
Ниже приведен статический пример, чтобы вы могли увидеть минимальные требования и то, как все части собраны вместе:
<!doctype html>
<html lang="en">
<head>
  <meta charset="utf-8">
  <meta name="viewport" content="width=device-width, initial-scale=1, shrink-to-fit=no">
  <title>Static Example</title>

  <!-- jQuery -->
  <script src="https://code.jquery.com/jquery-3.3.1.slim.min.js" integrity="sha384-q8i/X+965DzO0rT7abK41JStQIAqVgRVzpbzo5smXKp4YfRvH+8abtTE1Pi6jizo" crossorigin="anonymous"></script>

  <!-- XDSoft DateTimePicker -->
  <link rel="stylesheet" href="https://cdnjs.cloudflare.com/ajax/libs/jquery-datetimepicker/2.5.20/jquery.datetimepicker.min.css" integrity="sha256-DOS9W6NR+NFe1fUhEE0PGKY/fubbUCnOfTje2JMDw3Y=" crossorigin="anonymous" />
  <script src="https://cdnjs.cloudflare.com/ajax/libs/jquery-datetimepicker/2.5.20/jquery.datetimepicker.full.min.js" integrity="sha256-FEqEelWI3WouFOo2VWP/uJfs1y8KJ++FLh2Lbqc8SJk=" crossorigin="anonymous"></script>
</head>
<body>

  <input id="datetimepicker" type="text">

  <script>
    $(function () {
      $("#datetimepicker").datetimepicker();
    });
  </script>

</body>
</html>
Прямое использование
Базовая интеграция с Django выглядит примерно так:
forms.py
from django import forms

class DateForm(forms.Form):
    date = forms.DateTimeField(input_formats=['%d/%m/%Y %H:%M'])
Простая форма, виджет по умолчанию, ничего необычного.
И шаблон:
{{ form.date }}

<script>
  $(function () {
    $("#id_date").datetimepicker({
      format: 'd/m/Y H:i',
    });
  });
</script>
id_date — это идентификатор по умолчанию, который Django генерирует для полей формы (id_ + name).
Пользовательский виджет
core/widgets.py
from django.forms import DateTimeInput

class XDSoftDateTimePickerInput(DateTimeInput):
    template_name = 'widgets/xdsoft_datetimepicker.html'
widgets/xdsoft_datetimepicker.html
{% include "django/forms/widgets/input.html" %}

<script>
  $(function () {
    $("input[name='{{ widget.name }}']").datetimepicker({
      format: 'd/m/Y H:i',
    });
  });
</script>
Чтобы сделать общую реализацию, на этот раз мы выбираем поле для инициализации компонента, используя его имя вместо его id, если пользователь изменит префикс id.
Теперь использование:
core/forms.py
from django import forms
from .widgets import XDSoftDateTimePickerInput

class DateForm(forms.Form):
    date = forms.DateTimeField(
        input_formats=['%d/%m/%Y %H:%M'],
        widget=XDSoftDateTimePickerInput()
    )
Шаблон
{{ form.date }}
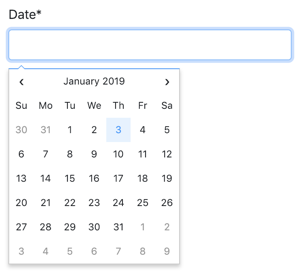
Fengyuan Chen’s Datepicker
Это очень красивый и минималистский компонент выбора дат. К сожалению нет поддержки времени. Но если вам нужны только даты, это отличный выбор.
Чтобы установить его, вы можете использовать их CDN или загрузить исходники. Обратите внимание, что они не предоставляют скомпилированные/обработанные файлы JavaScript. Но вы можете загрузить их на свой локальный компьютер, используя CDN.
<!doctype html>
<html lang="en">
<head>
  <meta charset="utf-8">
  <meta name="viewport" content="width=device-width, initial-scale=1, shrink-to-fit=no">
  <title>Static Example</title>
  <style>body {font-family: Arial, sans-serif;}</style>

  <!-- jQuery -->
  <script src="https://code.jquery.com/jquery-3.3.1.slim.min.js" integrity="sha384-q8i/X+965DzO0rT7abK41JStQIAqVgRVzpbzo5smXKp4YfRvH+8abtTE1Pi6jizo" crossorigin="anonymous"></script>

  <!-- Fengyuan Chen's Datepicker -->
  <link rel="stylesheet" href="https://cdnjs.cloudflare.com/ajax/libs/datepicker/0.6.5/datepicker.min.css" integrity="sha256-b88RdwbRJEzRx95nCuuva+hO5ExvXXnpX+78h8DjyOE=" crossorigin="anonymous" />
  <script src="https://cdnjs.cloudflare.com/ajax/libs/datepicker/0.6.5/datepicker.min.js" integrity="sha256-/7FLTdzP6CfC1VBAj/rsp3Rinuuu9leMRGd354hvk0k=" crossorigin="anonymous"></script>
</head>
<body>

  <input id="datepicker">

  <script>
    $(function () {
      $("#datepicker").datepicker();
    });
  </script>

</body>
</html>
Прямое использование
Базовая интеграция:
forms.py
from django import forms

class DateForm(forms.Form):
    date = forms.DateField(input_formats=['%d/%m/%Y'])
Шаблон
{{ form.date }}

<script>
  $(function () {
    $("#id_date").datepicker({
      format:'dd/mm/yyyy',
    });
  });
</script>
Пользовательский виджет
core/widgets.py
from django.forms import DateInput

class FengyuanChenDatePickerInput(DateInput):
    template_name = 'widgets/fengyuanchen_datepicker.html'
widgets/fengyuanchen_datepicker.html
{% include "django/forms/widgets/input.html" %}

<script>
  $(function () {
    $("input[name='{{ widget.name }}']").datepicker({
      format:'dd/mm/yyyy',
    });
  });
</script>
Использование:
core/forms.py
from django import forms
from .widgets import FengyuanChenDatePickerInput

class DateForm(forms.Form):
    date = forms.DateTimeField(
        input_formats=['%d/%m/%Y %H:%M'],
        widget=FengyuanChenDatePickerInput()
    )
Шаблон
{{ form.date }}
Выводы
Реализация очень похожа, независимо от того, что вы используете. Надеемся, что это руководство дало некоторое представление о том, как интегрировать такую библиотеку внешнего компонента в проект Django.
Как всегда, лучшим источником информации о каждой из этих библиотек является их официальная документация.
https://simpleisbetterthancomplex.com/tutorial/2019/01/03/how-to-use-date-picker-with-django.html
Вернуться на верх